SSBB Icon.png

Mario (SSBB)/Up special

From SmashWiki, the Super Smash Bros. wiki
< Mario (SSBB)
Revision as of 15:36, September 13, 2020 by PorpleBot (talk | contribs) (Text replacement - " " to " ")
Jump to navigationJump to search
This article is about the hitbox visualization in Super Smash Bros. Brawl. For the move itself, see Super Jump Punch.
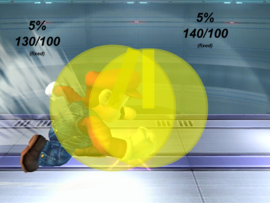
Hitbox visualization of the first hit of Mario's Super Jump Punch.
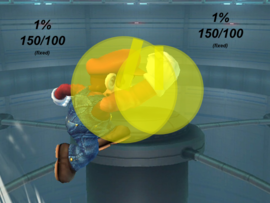
Hitbox visualization of hits 2-4 Mario's Super Jump Punch.
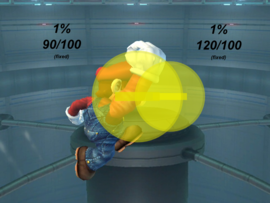
Hitbox visualization of hits 5-6 Mario's Super Jump Punch.
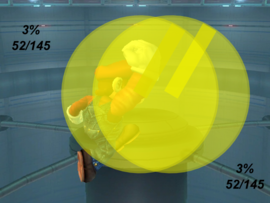
Hitbox visualization of the final hit of Mario's Super Jump Punch.

Overview

Mario's up special move is a rising uppercut known as the Super Jump Punch, which is based on Mario's jump from the original 2D Mario games. It has seven hits and deals 13% when fresh and if all hits connect. It is Mario's primary recovery move, which can be angled to alter the amount of horizontal or vertical distance Mario can travel. Mario can also reverse the move.

As a recovery move, it is unimpressive as it does not cover much distance. While Mario can mix up Super Jump Punch's arc, it is usually not effective enough to safely get back onto the stage. The move also has a rather short hitbox duration and it has a decent amount of ending lag and landing lag, which makes the move easily punishable if Mario does not grab the ledge or land the attack on his opponent. This also means that the move can easily be edgehogged and even if Mario does grab the ledge (or if he is hit out of it), the move suffers from the landing lag glitch, which leaves Mario in a vulnerable position when he next goes in the air. As a result, it is a rather exploitable recovery move and as Mario is often forced to use it as his recovery options are very limited outside of it.

Super Jump Punch however, does also have utility as an attack. The move comes out on frame 3, making it the fastest up special in the game by two frames. In addition to this, Mario is also intangible while the first hitbox is active. This makes the move a very useful out of shield, as Mario can use it to punish moves no other out of shield option in the game can. It also has decent horizontal range, having more range than his grab (and it can hit opponents behind him). While it is unrivalled in speed as a punishment option out of shield, it is not the best defensive option out of shield. While Marth's Dolphin Slash is two frames slower than Super Jump Punch, it gains intangibility on frame 1 as opposed to frame 3 (in addition to being a much stronger attack), so while Super Jump Punch can punish moves Dolphin Slash cannot, Dolphin Slash can be used to escape pressure in situations where it would not be possible with Super Jump Punch. As a result, while Super Jump Punch is the best out of shield option in the game to deal with -3 or -4 moves on shield, there are more effective out of shield options possessed by other characters in other situations, although it still remains a highly solid yet risky option due to its speed.

Super Jump Punch itself is not a super effective attack (outside of its very low startup lag) as while it deals a decent amount of damage, its final hit cannot KO unless the opponent is super close to the blastzone at a high percent and as it is a multi-hit, the opponent can SDI out of the move. The move is also very easily punishable if the opponent shields it or if Mario whiffs it, as Mario is left in an extremely vulnerable position after using it. The move is still a decent option to catch people near the upper blastzone although it will not KO in most incidences.

Overall, Super Jump Punch is a useful yet flawed recovery move and a highly useful out of shield option.

Hitboxes

ID Part Damage SD Angle BK KS FKV Radius Bone Offset SDIx T% Clang Rebound Type Effect G A Sound Direct
Hit 1
0 0 5% 0 AngleIcon70.png 0 100 130 7.0 0 5.0 6.0 0.0 1.0x 1.0x 0% no flag data specified
1 0 5% 0 AngleIcon90.png 0 100 140 6.0 0 9.0 6.0 0.0 1.0x 1.0x 0% no flag data specified
Hits 2-4
0 0 1% 0 AngleIcon74.png 0 100 150 6.0 0 4.5 7.0 0.0 1.0x 1.0x 0% no flag data specified
1 0 1% 0 AngleIcon90.png 0 100 150 5.0 0 8.5 7.0 0.0 1.0x 1.0x 0% no flag data specified
Hit 5-6
0 0 1% 0 Autolink angle (365) 0 100 90 5.5 0 4.5 7.0 0.0 1.0x 1.0x 0% no flag data specified
1 0 1% 0 Autolink angle (365) 0 100 120 4.2 0 8.5 7.0 0.0 1.0x 1.0x 0% no flag data specified
Hit 7
0 0 3% 0 AngleIcon60.png 52 145 0 10.0 0 4.5 7.0 0.0 1.0x 1.0x 0% no flag data specified
1 0 3% 0 AngleIcon60.png 52 145 0 10.0 0 8.5 7.0 0.0 1.0x 1.0x 0% no flag data specified

Timing

Intangibility 3-6
Hit 1 3-6
Hits 2-4 7, 8, 9
Hits 5-6 10-11, 12-13
Hit 7 14-15
Animation length 37
FrameIcon(Lag).png FrameIcon(Lag).png FrameIcon(Hitbox).png FrameIcon(Hitbox).png FrameIcon(Hitbox).png FrameIcon(HitboxChangeS).png FrameIcon(HitboxChangeM).png FrameIcon(HitboxChangeM).png FrameIcon(HitboxChangeM).png FrameIcon(HitboxChangeE).png FrameIcon(HitboxChangeS).png FrameIcon(HitboxChangeE).png FrameIcon(HitboxChangeS).png FrameIcon(HitboxChangeE).png FrameIcon(Hitbox).png FrameIcon(Lag).png FrameIcon(Lag).png FrameIcon(Lag).png FrameIcon(Lag).png FrameIcon(Lag).png FrameIcon(Lag).png FrameIcon(Lag).png FrameIcon(Lag).png FrameIcon(Lag).png FrameIcon(Lag).png FrameIcon(Lag).png FrameIcon(Lag).png FrameIcon(Lag).png FrameIcon(Lag).png FrameIcon(Lag).png FrameIcon(Lag).png FrameIcon(Lag).png FrameIcon(Lag).png FrameIcon(Lag).png FrameIcon(Lag).png FrameIcon(Lag).png FrameIcon(Lag).png
FrameIcon(Vulnerable).png FrameIcon(Vulnerable).png FrameIcon(Intangible).png FrameIcon(Intangible).png FrameIcon(Intangible).png FrameIcon(Intangible).png FrameIcon(Vulnerable).png FrameIcon(Vulnerable).png FrameIcon(Vulnerable).png FrameIcon(Vulnerable).png FrameIcon(Vulnerable).png FrameIcon(Vulnerable).png FrameIcon(Vulnerable).png FrameIcon(Vulnerable).png FrameIcon(Vulnerable).png FrameIcon(Vulnerable).png FrameIcon(Vulnerable).png FrameIcon(Vulnerable).png FrameIcon(Vulnerable).png FrameIcon(Vulnerable).png FrameIcon(Vulnerable).png FrameIcon(Vulnerable).png FrameIcon(Vulnerable).png FrameIcon(Vulnerable).png FrameIcon(Vulnerable).png FrameIcon(Vulnerable).png FrameIcon(Vulnerable).png FrameIcon(Vulnerable).png FrameIcon(Vulnerable).png FrameIcon(Vulnerable).png FrameIcon(Vulnerable).png FrameIcon(Vulnerable).png FrameIcon(Vulnerable).png FrameIcon(Vulnerable).png FrameIcon(Vulnerable).png FrameIcon(Vulnerable).png FrameIcon(Vulnerable).png

Landing lag

Animation length 30
FrameIcon(Lag).png FrameIcon(Lag).png FrameIcon(Lag).png FrameIcon(Lag).png FrameIcon(Lag).png FrameIcon(Lag).png FrameIcon(Lag).png FrameIcon(Lag).png FrameIcon(Lag).png FrameIcon(Lag).png FrameIcon(Lag).png FrameIcon(Lag).png FrameIcon(Lag).png FrameIcon(Lag).png FrameIcon(Lag).png FrameIcon(Lag).png FrameIcon(Lag).png FrameIcon(Lag).png FrameIcon(Lag).png FrameIcon(Lag).png FrameIcon(Lag).png FrameIcon(Lag).png FrameIcon(Lag).png FrameIcon(Lag).png FrameIcon(Lag).png FrameIcon(Lag).png FrameIcon(Lag).png FrameIcon(Lag).png FrameIcon(Lag).png FrameIcon(Lag).png
Legend (1 square = 1 frame)
FrameIcon(Lag).png
Lag time
FrameIcon(Hitbox).png
Hitbox
FrameIcon(HitboxChangeS).pngFrameIcon(HitboxChangeE).png
Hitbox change
FrameIcon(Vulnerable).png
Vulnerable
FrameIcon(Intangible).png
Intangible