SSB64 Icon.png

Kirby (SSB)/Up special

From SmashWiki, the Super Smash Bros. wiki
Jump to navigationJump to search
This article is about the hitbox visualization in Super Smash Bros.. For the move itself, see Final Cutter.

Overview

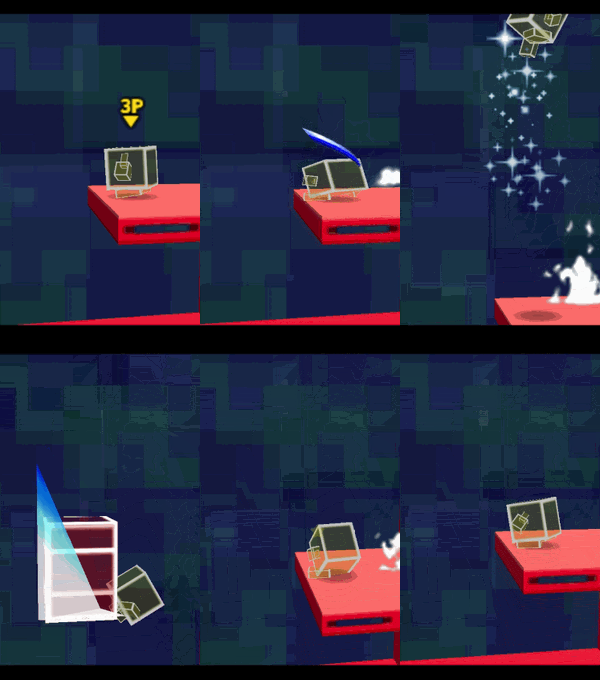
Hitbox of Kirby's Final Cutter in Smash 64.
Hitbox of Kirby's up special.

The special move's name is Final Cutter, where Kirby pulls out a blade, goes up in midair while swinging it upward, and, once at a certain height, falls down to the ground while bringing the blade downwards. When he lands, it will also make a wave projectile that will travel a certain distance in the direction Kirby is facing. This attack deals 8% damage when Kirby swings upwards, 2% damage when swinging downwards, and 3% damage when Kirby smashes the blade for a total of 13% damage, with the wave doing 6% damage and decent knockback.

The move is mainly used for his recovery, giving decent vertical distance and a bit of horizontal distance if the player tilts the control stick left or right. However, if Kirby is offstage and uses this move and does not make it to the edge, he will be unable to do anything, so he will plummet to the lower blast line and SD.

When Kirby is descending, it gives a very powerful meteor smash with set knockback. Thus it can potentially good for edge-guarding, but again, if it is used offstage, Kirby must be able to grab the edge or he will SD. The move is able to edgeguard certain recoveries such as Pikachu's Quick Attack and Fox's Fire Fox if used near the edge while facing offstage, due to the opponent heading into it. It is not recommended to use this onstage, as the horizontally-hitting hitbox that the meteor smashed opponent will be linked into lacks power and combo ability, and it is possible for the opponent to trade with the meteor smash hit, using moves with fast startup, such as many neutral aerials.

Glitches

There are two known glitches in Final Cutter.

One is called Kirby's Sliding Up B done by: Dashing, wait for the dash to to finish which is about 14 frames, turning instantly, and then do an Up+B 20 frames after you decided to do so. This is similar to Teleporting but is harder and is generally limited to flashy play/TASing. This was discovered by DSGnoll, a Japanese smash 64 player. The video, as popularized by Jpheal, a well known TAS player.

The other is the Bigger Kirby Glitch, where if Kirby uses Final Cutter in midair, whether he lands or not, he will grow slightly, an 8.7% increase (0.91x (0.94x in the Japanese version) → 1.0x). This lasts until Kirby loses a stock. This can actually have an effect on gameplay: Being larger, an advantage is that Kirby has more range. He can up smash from the ground in Dream Land and hit one of the lower platforms. This can also improve his spacing game, as it improves range noticeably on his neutral aerial and up tilt. However, the downside is that his hurtbox is larger, so, for example, he can no longer reliably crouch under Samus' fully charged Charge Shot. Discussed here.

Hitboxes

ID Part Damage SD Angle BK KS FKV Radius Bone Offset Clang Effect G A Sound
Rising
0 0 8% 0 AngleIcon88.png 0 100 121 75 0 0 100 200 HitboxTableIcon(Clang).png EffectIcon(Slash).png HitboxTableIcon(GroundedTrue).png HitboxTableIcon(AerialTrue).png L Slash
1 0 8% 0 AngleIcon96.png 0 100 121 75 0 0 100 530 HitboxTableIcon(Clang).png EffectIcon(Slash).png HitboxTableIcon(GroundedTrue).png HitboxTableIcon(AerialTrue).png L Slash
2 0 8% 0 AngleIcon88.png 0 100 105 75 0 0 400 200 HitboxTableIcon(Clang).png EffectIcon(Slash).png HitboxTableIcon(GroundedTrue).png HitboxTableIcon(AerialTrue).png L Slash
3 0 8% 0 AngleIcon96.png 0 100 105 75 0 0 400 530 HitboxTableIcon(Clang).png EffectIcon(Slash).png HitboxTableIcon(GroundedTrue).png HitboxTableIcon(AerialTrue).png L Slash
Falling (clean)
0 0 2% 0 AngleIcon-85.png 0 100 200 165 0 0 300 400 HitboxTableIcon(Clang).png EffectIcon(Slash).png HitboxTableIcon(GroundedTrue).png HitboxTableIcon(AerialTrue).png L Slash
Falling (late)
0 0 2% 0 AngleIcon-85.png 0 100 200 225 0 0 300 400 HitboxTableIcon(Clang).png EffectIcon(Slash).png HitboxTableIcon(GroundedTrue).png HitboxTableIcon(AerialTrue).png L Slash
Wave
0 0 6% 1 Sakurai angle 70 50 0 125 0 0 0 0 HitboxTableIcon(NoClang).png EffectIcon(Slash).png HitboxTableIcon(GroundedTrue).png HitboxTableIcon(AerialTrue).png M Slash

Timing

Attack

Rising hit 23
Falling hit 46-49
Falling hit (late) 54-56
Animation length 57
FrameIcon(Lag).png FrameIcon(Lag).png FrameIcon(Lag).png FrameIcon(Lag).png FrameIcon(Lag).png FrameIcon(Lag).png FrameIcon(Lag).png FrameIcon(Lag).png FrameIcon(Lag).png FrameIcon(Lag).png FrameIcon(Lag).png FrameIcon(Lag).png FrameIcon(Lag).png FrameIcon(Lag).png FrameIcon(Lag).png FrameIcon(Lag).png FrameIcon(Lag).png FrameIcon(Lag).png FrameIcon(Lag).png FrameIcon(Lag).png FrameIcon(Lag).png FrameIcon(Lag).png FrameIcon(Hitbox).png FrameIcon(Lag).png FrameIcon(Lag).png FrameIcon(Lag).png FrameIcon(Lag).png FrameIcon(Lag).png FrameIcon(Lag).png FrameIcon(Lag).png FrameIcon(Lag).png FrameIcon(Lag).png FrameIcon(Lag).png FrameIcon(Lag).png FrameIcon(Lag).png FrameIcon(Lag).png FrameIcon(Lag).png FrameIcon(Lag).png FrameIcon(Lag).png FrameIcon(Lag).png FrameIcon(Lag).png FrameIcon(Lag).png FrameIcon(Lag).png FrameIcon(Lag).png FrameIcon(Lag).png FrameIcon(Hitbox).png FrameIcon(Hitbox).png FrameIcon(Hitbox).png FrameIcon(Hitbox).png FrameIcon(Lag).png FrameIcon(Lag).png FrameIcon(Lag).png FrameIcon(Lag).png FrameIcon(Hitbox).png FrameIcon(Hitbox).png FrameIcon(Hitbox).png FrameIcon(Lag).png

Landing lag

Wave hitbox 4-22
Animation length 35
FrameIcon(Blank).png FrameIcon(Blank).png FrameIcon(Blank).png FrameIcon(Hitbox).png FrameIcon(Hitbox).png FrameIcon(Hitbox).png FrameIcon(Hitbox).png FrameIcon(Hitbox).png FrameIcon(Hitbox).png FrameIcon(Hitbox).png FrameIcon(Hitbox).png FrameIcon(Hitbox).png FrameIcon(Hitbox).png FrameIcon(Hitbox).png FrameIcon(Hitbox).png FrameIcon(Hitbox).png FrameIcon(Hitbox).png FrameIcon(Hitbox).png FrameIcon(Hitbox).png FrameIcon(Hitbox).png FrameIcon(Hitbox).png FrameIcon(Hitbox).png FrameIcon(Blank).png FrameIcon(Blank).png FrameIcon(Blank).png FrameIcon(Blank).png FrameIcon(Blank).png FrameIcon(Blank).png FrameIcon(Blank).png FrameIcon(Blank).png FrameIcon(Blank).png FrameIcon(Blank).png FrameIcon(Blank).png FrameIcon(Blank).png FrameIcon(Blank).png
FrameIcon(Lag).png FrameIcon(Lag).png FrameIcon(LagPropS).png FrameIcon(LagPropE).png FrameIcon(Lag).png FrameIcon(Lag).png FrameIcon(Lag).png FrameIcon(Lag).png FrameIcon(Lag).png FrameIcon(Lag).png FrameIcon(Lag).png FrameIcon(Lag).png FrameIcon(Lag).png FrameIcon(Lag).png FrameIcon(Lag).png FrameIcon(Lag).png FrameIcon(Lag).png FrameIcon(Lag).png FrameIcon(Lag).png FrameIcon(Lag).png FrameIcon(Lag).png FrameIcon(Lag).png FrameIcon(Lag).png FrameIcon(Lag).png FrameIcon(Lag).png FrameIcon(Lag).png FrameIcon(Lag).png FrameIcon(Lag).png FrameIcon(Lag).png FrameIcon(Lag).png FrameIcon(Lag).png FrameIcon(Lag).png FrameIcon(Lag).png FrameIcon(Lag).png FrameIcon(Lag).png
Legend (1 square = 1 frame)
FrameIcon(Lag).png
Lag time
FrameIcon(Hitbox).png
Hitbox
FrameIcon(BlankPropS).pngFrameIcon(BlankPropE).png
Prop event

Gallery