Giant Punch
| Giant Punch | |
|---|---|
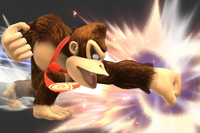
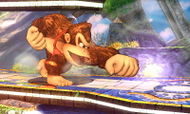
| File:Donkey Kong Giant Punch.png Giant Punch in Super Smash Bros. Brawl. | |
| User | Donkey Kong |
| Universe | Donkey Kong |
| Article on Super Mario Wiki | Giant Punch |
| “ | Press File:GCN BButton.png to charge, then again to punch. Press File:GCN LButton.png, File:GCN RButton.png, or File:GCN ZButton.png to stop charging. | ” |
| —Melee's instruction manual | ||
| “ | Charge with B, then press again to punch. Quit charging with Z. | ” |
| —Brawl's instruction manual | ||
| “ | Charge with |
” |
| —Smash for 3DS's foldout | ||
| “ | Charges up a punch that can keep charging after dodging or shielding. | ” |
| —Ultimate's move list | ||
Giant Punch (ジャイアントパンチ, Giant Punch), commonly referred to as the Punch and Donkey Punch, is Donkey Kong's neutral special move.
Overview
By pressing the special move button, Donkey Kong will start swinging his arm around, automatically charging a wind-up punch that, when thrown, causes great damage and knockback if it hits, especially when fully or nearly-fully charged.
For every time that Donkey Kong swings his fist, the charge advances to its next stage, entailing an increase in the damage of the punch. After any one of these swings, the charge can be cancelled and stored to be continued later: by pressing the shield button while charging, Donkey Kong will shield, and moving the control stick left or right will cause him to roll. If Donkey Kong suffers knockback while charging, he will invariably lose all of his charge.
At any time while Donkey Kong is swinging his fist around, the button can be pressed again to deliver the blow. If the button is not pressed, then after ten swings, Donkey Kong will drop his fist and his head will begin to smoke, indicating the punch is fully charged. At this point the button only needs to be pressed once to administer the attack. From Brawl onwards, a fully charged Giant Punch grants Donkey Kong armor when used, allowing him to power through an enemy's KO attack while he uses one of his own in the process. However, a Giant Punch that has just one stage below full charge has noticeably higher knockback.
From Melee onward, the move becomes markedly weaker if used in midair, and also causes Donkey Kong to become helpless, making it very risky and much less rewarding to use in aerial combat compared to its utility on the ground.
Aesthetically, the move has been through a few changes. In Smash 64, Donkey Kong has his right hand directly behind him while his fist winds up. From Melee to Smash 4, Donkey Kong uses his left arm for the attack, while also winding up his arm beside himself. The move was the slowest in Smash 64 with some notable recovery, though the animation for both the actual attack's startup and its recovery has been sped up in later games.
In Ultimate, Donkey Kong now charges Giant Punch with either arm due to his mirrored stance. It also no longer puts him into a helpless state, similar to Smash 64. After fully charging his Giant Punch, Donkey Kong now displays an angry expression until he unleashes his Giant Punch.
Stages
As explained above, Giant Punch's charge goes through stages. These are visually recorded in the swings of Donkey Kong's arm; each time he swings, the punch's damage and knockback is generally increased. The charge has eleven stages in total; the eleventh stage is the fully charged stage. A fully charged Giant Punch will have a quicker animation, resulting in a quicker punch, and do the most damage, but is weaker in knockback than a few of the stages below it. From Melee onwards, all stages of the punch are weaker when used in mid-air.

Smash 64 stages
| Stage | Number of swings | Damage | Percent that can KO | Elbow damage | Elbow percent that can KO |
|---|---|---|---|---|---|
| Stage 1 | 1 | 14% | |||
| Stage 2 | 2 | 16% | |||
| Stage 3 | 3 | 18% | |||
| Stage 4 | 4 | 20% | |||
| Stage 5 | 5 | 22% | |||
| Stage 6 | 6 | 23% | |||
| Stage 7 | 7 | 26% | |||
| Stage 8 | 8 | 28% | |||
| Stage 9 | 9 | 30% | 65% | ||
| Stage 10 | 10 | 32% | 50% | 31% | |
| Stage 11 | 11 | 36% | 48% | 35% |
Brawl stages
| Stage | Number of swings | Damage | Percent that can KO | Elbow damage | Elbow percent that can KO |
|---|---|---|---|---|---|
| Stage 1 | 1 | 10% | 178% | 12% | 146% |
| Stage 2 | 2 | 12% | 150% | 14% | 124% |
| Stage 3 | 3 | 14% | 126% | 16% | 107% |
| Stage 4 | 4 | 16% | 110% | 18% | 93% |
| Stage 5 | 5 | 18% | 95% | 20% | 81% |
| Stage 6 | 6 | 20% | 83% | 22% | 70% |
| Stage 7 | 7 | 22% | 72% | 24% | 61% |
| Stage 8 | 8 | 24% | 63% | 26% | 53% |
| Stage 9 | 9 | 26% | 55% | 28% | 46% |
| Stage 10 | 10 | 28% | 48% | 30% | 39% |
| Stage 11 | 11 | 28% | 72% | 18% | 101% |
| Aerial stage 1 | 1 | 6% | 276% | 8% | 213% |
| Aerial stage 2 | 2 | 8% | 218% | 10% | 174% |
| Aerial stage 3 | 3 | 10% | 178% | 12% | 146% |
| Aerial stage 4 | 4 | 12% | 150% | 14% | 124% |
| Aerial stage 5 | 5 | 14% | 126% | 16% | 107% |
| Aerial stage 6 | 6 | 16% | 110% | 18% | 93% |
| Aerial stage 7 | 7 | 18% | 95% | 20% | 81% |
| Aerial stage 8 | 8 | 20% | 83% | 22% | 70% |
| Aerial stage 9 | 9 | 22% | 72% | 24% | 61% |
| Aerial stage 10 | 10 | 24% | 63% | 26% | 53% |
| Aerial stage 11 | 11 | 25% | 86% | 15% | 125% |
- Note, not only does a stage ten Giant Punch have more knockback than a fully charged punch, but stages eight and nine also have more knockback.
- The sweet spot for an uncharged Giant Punch is at the elbow.
SSB4 stages
| Stage | Number of swings | Damage | Percent that can KO | Elbow damage | Elbow percent that can KO |
|---|---|---|---|---|---|
| Stage 1 | 1 | 10% | 183% | 12% | 146% |
| Stage 2 | 2 | 12% | 153% | 14% | 125% |
| Stage 3 | 3 | 14% | 131% | 16% | 107% |
| Stage 4 | 4 | 16% | 113% | 18% | 93% |
| Stage 5 | 5 | 18% | 98% | 20% | 81% |
| Stage 6 | 6 | 20% | 85% | 22% | 71% |
| Stage 7 | 7 | 22% | 75% | 24% | 62% |
| Stage 8 | 8 | 24% | 65% | 26% | 53% |
| Stage 9 | 9 | 26% | 57% | 28% | 46% |
| Stage 10 | 10 | 28% | 49% | 30% | 40% |
| Stage 11 | 11 | 28% | 74% | 18% | 234% |
| Aerial stage 1 | 1 | 6% | 284% | 8% | 214% |
| Aerial stage 2 | 2 | 8% | 223% | 10% | 175% |
| Aerial stage 3 | 3 | 10% | 183% | 12% | 146% |
| Aerial stage 4 | 4 | 12% | 153% | 14% | 125% |
| Aerial stage 5 | 5 | 14% | 131% | 16% | 107% |
| Aerial stage 6 | 6 | 16% | 113% | 18% | 93% |
| Aerial stage 7 | 7 | 18% | 98% | 20% | 81% |
| Aerial stage 8 | 8 | 20% | 85% | 22% | 71% |
| Aerial stage 9 | 9 | 22% | 75% | 24% | 62% |
| Aerial stage 10 | 10 | 24% | 65% | 26% | 53% |
| Aerial stage 11 | 11 | 25% | 88% | 15% | 126% |
Video
A video showcasing all the stages of Brawl's Giant Punch.
Customization
Special Move customization was added in Super Smash Bros. 4. These are the variations:
| 1. Giant Punch | 2. Lightning Punch | 3. Storm Punch |
|---|---|---|
 |
 |
 |
| "A mighty punch. Press the button once to charge it, then again to release it." | "Charges up much faster, but isn't quite as mighty. Deals electrical damage." | "A punch that's not very strong, but it pushes opponents away with a gust of wind." |
- Giant Punch: Default.
- Lightning Punch: An electric punch that charges up much faster, but is weaker and doesn't have flinch resistance. Deals 15% damage at full charge and the move has slightly less startup than Giant Punch.
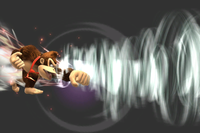
- Storm Punch: Less powerful, but charges faster and generates a whirlwind that blows opponents away. The whirlwind itself is enough to send opponents flying off-stage at high percentages, if not also KO them by sending them towards the side blastline. The move does 18% damage.
Gallery
Charging a Giant Punch in Super Smash Bros.
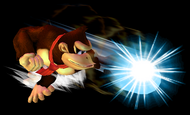
Giant Punch in Melee.
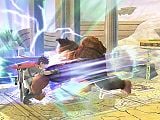
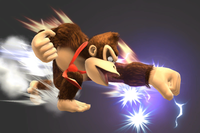
Donkey Kong using the Giant Punch on Ike in Brawl.
Donkey Kong using the Giant Punch on Samus in Super Smash Bros. for Wii U.
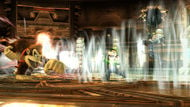
Donkey Kong using the custom Storm Punch in Super Smash Bros. for Wii U.
Giant Punch in Smash 3DS.


Trivia
- In Smash 64, instead of Donkey Kong's head steaming to show he's fully charged, his fist will spark.
- In addition, unlike in all subsequent games, Donkey Kong uses his right hand to throw the punch in Smash 64.
- In Melee, the move is stronger if the player doesn't store the charge before using it.
- Donkey Kong has done a similar move to this one in other forms of media outside of Smash Bros.:
- Donkey Kong performed a punch comparable to the Giant Punch in the Donkey Kong Country episode "Bad Hair Day".
- When a player lands on a Bowser Space in Mario Party 5, Donkey Kong may appear and punch Bowser in a similar way to the Giant Punch.
- In the ending of Donkey Kong Country Returns, Donkey Kong uses a move similar to this when he is falling, charging his punch and striking the moon.