SSBU Icon.png

Falco (SSBU)/Down throw

From SmashWiki, the Super Smash Bros. wiki
Jump to navigationJump to search
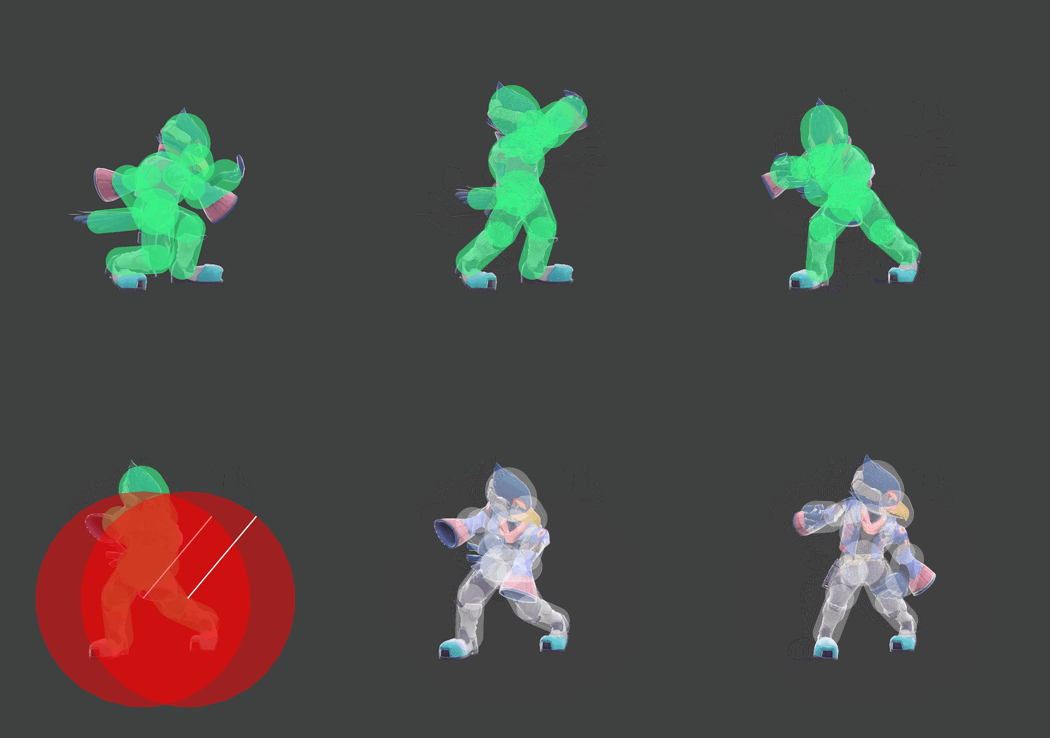
Hitbox visualization showing Falco's down throw.

Overview[edit]

Falco pins his opponent to the ground and shoots a laser. Without DI, the throw sends the opponent at a ~45° angle. With DI, the throw can send at higher or more outward angles, with DI in and away respectively.

Down throw is one of Falco's best combo starters at low-mid percentages, as it sets up into a lot of his main combo routes, with Falco being able to follow up with:

The most rewarding moves Falco can get off of down throw are forward air and up tilt. With forward air, Falco is able to get loops with drag down forward air, where he can re-grab into down throw and repeat the loop again (~3 reps on the average middleweight). He can also drag down forward air into loops with down tilt (2 reps of down tilt out of down throw; if you start with down tilt, it is possible to get 3). With up tilt, Falco can combo the move into itself as well as (at slightly higher percentages) into up air and neutral air, which can lead into other combo routes. It is also possible to combo into up tilt with drag down forward air, as well as neutral air can combo into drag down forward air, which can lead into the previously mentioned combo routes that forward air and up tilt lead into. That fact that down throw offers the possibility of comboing into drag down forward air and up tilt, which isn't possible with up throw, or at least offer the same kind of follow ups, gives a reason to choose it over up throw, as Falco can deal lots of damage with these combo routes.

These follow ups stop being guaranteed after around mid percentages (~40% onward on average middle weights), and can be influenced by DIing away in order to end combos even earlier. After the window for guaranteed follow ups has ended, down throw does not have any other big uses outside of gaining stage control/sending opponents offstage; however, forward throw is much more effective at doing so, as it sends farther and at a lower angle, which makes it harder for opponents to recover from. For continuing to combo off of throws after mid percentages, up throw has follow ups that continue after mid percentages where down throw can't be followed up on.

Overall, down throw is a good move that Falco can get a lot off on. It is able to reliably combo into his main combo extenders (drag down forward air & up tilt) from low-mid percentages, which lead into his heavy hitting combo routes where he is able to deal lots of damage. When percentages get too high and Falco can't convert off of down throw anymore, it has very few uses that are not done better by most of his other moves (forward throw & up throw).

Throw and Hitbox Data[edit]

ID Part Rehit rate Damage SD Angle Angle type BK KS FKV Set weight Radius Bone Offset SDI× T% Clang Rebound Effect Type G A Sound Direct Hit bits Hit part Blockable Reflectable Absorbable Flinchless No GFX Heedless
Laser
0 0 0 2.0% 0 AngleIcon50.png Speed-based 60 80 0 HitboxTableIcon(False).png 9.6 top 0.0 0.0 4.0 0.9× 1.0× 0% HitboxTableIcon(NoClang).png HitboxTableIcon(NoRebound).png EffectIcon(Electric).png TypeIcon(Energy).png HitboxTableIcon(GroundedTrue).png HitboxTableIcon(AerialTrue).png M Falco Blaster SpecialsIndirect.png All All HitboxTableIcon(Blockable).png HitboxTableIcon(Reflectable).png HitboxTableIcon(Absorbable).png HitboxTableIcon(False).png HitboxTableIcon(False).png HitboxTableIcon(False).png
1 0 0 2.0% 0 AngleIcon50.png Speed-based 60 80 0 HitboxTableIcon(False).png 9.6 top 0.0 0.0 8.0 0.9× 1.0× 0% HitboxTableIcon(NoClang).png HitboxTableIcon(NoRebound).png EffectIcon(Electric).png TypeIcon(Energy).png HitboxTableIcon(GroundedTrue).png HitboxTableIcon(AerialTrue).png M Falco Blaster SpecialsIndirect.png All All HitboxTableIcon(Blockable).png HitboxTableIcon(Reflectable).png HitboxTableIcon(Absorbable).png HitboxTableIcon(False).png HitboxTableIcon(False).png HitboxTableIcon(False).png
Kind ID Damage Angle Angle type BK KS FKV Effect Type Sound
Throw
Throw 0 3.0% AngleIcon50.png Forward 60 110 0 0.0× EffectIcon(Normal).png TypeIcon(Throwing).png S None
Break 0 3.0% Sakurai angle Forward 60 100 0 0.0× EffectIcon(Normal).png TypeIcon(Throwing).png S None

Timing[edit]

The hitbox duration assumes the laser doesn't hit the opponent, although due to Falco firing it before releasing the opponent, this is very unlikely.

Invincibility 1-33
Laser generated 26
Throw Release 33
Interruptible 44
Animation length 59
FrameIcon(Blank).png FrameIcon(Blank).png FrameIcon(Blank).png FrameIcon(Blank).png FrameIcon(Blank).png FrameIcon(Blank).png FrameIcon(Blank).png FrameIcon(Blank).png FrameIcon(Blank).png FrameIcon(Blank).png FrameIcon(Blank).png FrameIcon(Blank).png FrameIcon(Blank).png FrameIcon(Blank).png FrameIcon(Blank).png FrameIcon(Blank).png FrameIcon(Blank).png FrameIcon(Blank).png FrameIcon(Blank).png FrameIcon(Blank).png FrameIcon(Blank).png FrameIcon(Blank).png FrameIcon(Blank).png FrameIcon(Blank).png FrameIcon(Blank).png FrameIcon(Hitbox).png FrameIcon(Hitbox).png FrameIcon(Hitbox).png FrameIcon(Hitbox).png FrameIcon(Hitbox).png FrameIcon(Hitbox).png FrameIcon(Hitbox).png FrameIcon(Hitbox).png FrameIcon(Hitbox).png FrameIcon(Hitbox).png FrameIcon(Hitbox).png FrameIcon(Hitbox).png FrameIcon(Hitbox).png FrameIcon(Hitbox).png FrameIcon(Hitbox).png FrameIcon(Hitbox).png FrameIcon(Hitbox).png FrameIcon(Hitbox).png FrameIcon(Hitbox).png FrameIcon(Hitbox).png FrameIcon(Hitbox).png FrameIcon(Hitbox).png FrameIcon(Hitbox).png FrameIcon(Hitbox).png FrameIcon(Hitbox).png FrameIcon(Hitbox).png FrameIcon(Hitbox).png FrameIcon(Blank).png FrameIcon(Blank).png FrameIcon(Blank).png FrameIcon(Blank).png FrameIcon(Blank).png FrameIcon(Blank).png FrameIcon(Blank).png
FrameIcon(Lag).png FrameIcon(Lag).png FrameIcon(Lag).png FrameIcon(Lag).png FrameIcon(Lag).png FrameIcon(Lag).png FrameIcon(Lag).png FrameIcon(Lag).png FrameIcon(Lag).png FrameIcon(Lag).png FrameIcon(Lag).png FrameIcon(Lag).png FrameIcon(Lag).png FrameIcon(Lag).png FrameIcon(Lag).png FrameIcon(Lag).png FrameIcon(Lag).png FrameIcon(Lag).png FrameIcon(Lag).png FrameIcon(Lag).png FrameIcon(Lag).png FrameIcon(Lag).png FrameIcon(Lag).png FrameIcon(Lag).png FrameIcon(LagPropS).png FrameIcon(LagPropE).png FrameIcon(Lag).png FrameIcon(Lag).png FrameIcon(Lag).png FrameIcon(Lag).png FrameIcon(Lag).png FrameIcon(LagThrowS).png FrameIcon(LagThrowE).png FrameIcon(Lag).png FrameIcon(Lag).png FrameIcon(Lag).png FrameIcon(Lag).png FrameIcon(Lag).png FrameIcon(Lag).png FrameIcon(Lag).png FrameIcon(Lag).png FrameIcon(Lag).png FrameIcon(Lag).png FrameIcon(Interruptible).png FrameIcon(Interruptible).png FrameIcon(Interruptible).png FrameIcon(Interruptible).png FrameIcon(Interruptible).png FrameIcon(Interruptible).png FrameIcon(Interruptible).png FrameIcon(Interruptible).png FrameIcon(Interruptible).png FrameIcon(Interruptible).png FrameIcon(Interruptible).png FrameIcon(Interruptible).png FrameIcon(Interruptible).png FrameIcon(Interruptible).png FrameIcon(Interruptible).png FrameIcon(Interruptible).png
FrameIcon(Invincible).png FrameIcon(Invincible).png FrameIcon(Invincible).png FrameIcon(Invincible).png FrameIcon(Invincible).png FrameIcon(Invincible).png FrameIcon(Invincible).png FrameIcon(Invincible).png FrameIcon(Invincible).png FrameIcon(Invincible).png FrameIcon(Invincible).png FrameIcon(Invincible).png FrameIcon(Invincible).png FrameIcon(Invincible).png FrameIcon(Invincible).png FrameIcon(Invincible).png FrameIcon(Invincible).png FrameIcon(Invincible).png FrameIcon(Invincible).png FrameIcon(Invincible).png FrameIcon(Invincible).png FrameIcon(Invincible).png FrameIcon(Invincible).png FrameIcon(Invincible).png FrameIcon(Invincible).png FrameIcon(Invincible).png FrameIcon(Invincible).png FrameIcon(Invincible).png FrameIcon(Invincible).png FrameIcon(Invincible).png FrameIcon(Invincible).png FrameIcon(Invincible).png FrameIcon(Invincible).png FrameIcon(Vulnerable).png FrameIcon(Vulnerable).png FrameIcon(Vulnerable).png FrameIcon(Vulnerable).png FrameIcon(Vulnerable).png FrameIcon(Vulnerable).png FrameIcon(Vulnerable).png FrameIcon(Vulnerable).png FrameIcon(Vulnerable).png FrameIcon(Vulnerable).png FrameIcon(Vulnerable).png FrameIcon(Vulnerable).png FrameIcon(Vulnerable).png FrameIcon(Vulnerable).png FrameIcon(Vulnerable).png FrameIcon(Vulnerable).png FrameIcon(Vulnerable).png FrameIcon(Vulnerable).png FrameIcon(Vulnerable).png FrameIcon(Vulnerable).png FrameIcon(Vulnerable).png FrameIcon(Vulnerable).png FrameIcon(Vulnerable).png FrameIcon(Vulnerable).png FrameIcon(Vulnerable).png FrameIcon(Vulnerable).png
Legend (1 square = 1 frame)
FrameIcon(Lag).png
Lag time
FrameIcon(Vulnerable).png
Vulnerable
FrameIcon(Invincible).png
Invincible
FrameIcon(BlankPropS).pngFrameIcon(BlankPropE).png
Prop event
FrameIcon(BlankThrowS).pngFrameIcon(BlankThrowE).png
Throw point
FrameIcon(Interruptible).png
Interruptible