SSB4 Icon.png

Dr. Mario (SSB4)/Down aerial

From SmashWiki, the Super Smash Bros. wiki
< Dr. Mario (SSB4)
Revision as of 00:22, September 2, 2018 by EyeDonutz (talk | contribs) (added an update history for the move.)
Jump to navigationJump to search
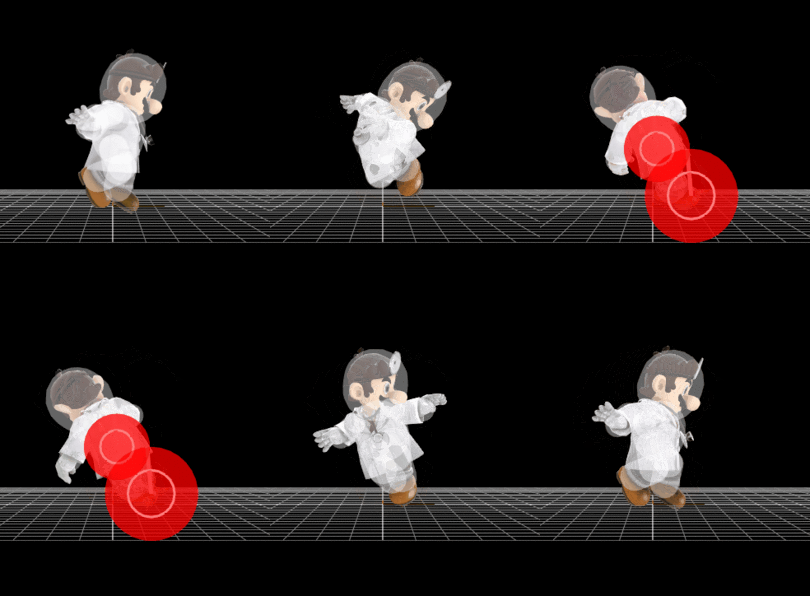
Hitbox visualization showing Dr. Mario's down aerial.
Data.png This article or section may require additional technical data.
You can discuss this issue on the talk page or edit this page to improve it.

Overview

Dr. Mario's down aerial is a drill kick with good horizontal knockback on the last hit. This move has a decent damage output, and like most drills, its hits connect more reliably than some other multi-hitting attacks, making it a proficient damage-racker. Its low angle also makes it good at gimping opponents recovering low. However, it has little horizontal range, not much use in combos due to its unfavorable launch angle, and it has no KO power whatsoever because of its low knockback scaling.

Update history

Super Smash Bros. for Nintendo 3DS 1.0.4

  • Nerf Down aerial deals 1.456% less damage: 10.976% → 9.52%.
  • Buff Down aerial's loop hits deal 0.336% more damage: 1.568% → 1.904%.
  • Buff Down aerial has decreased landing lag.
  • Nerf Down aerial hit rate decreased: 7 → 5. This makes it deal less damage overall: 14.336% → 12.88%.

Hitboxes

Looping hit rehits every 4 frames.

ID Part Damage SD Angle BK KS FKV Radius Bone Offset SDIx T% Clang Rebound Type Effect G A Sound Direct
Looping hit
0 0 1.904% 0 Autolink angle (366) 30 10 0 4.5 0 0.0 1.0 3.7 1.0x 1.0x 0% HitboxTableIcon(Clang).png HitboxTableIcon(Rebound).png TypeIcon(Foot).png EffectIcon(Normal).png HitboxTableIcon(GroundedFalse).png HitboxTableIcon(AerialTrue).png S Kick SpecialsDirect.png
1 0 1.904% 0 Autolink angle (366) 30 10 0 3.2 0 0.0 5.5 0.4 1.0x 1.0x 0% HitboxTableIcon(Clang).png HitboxTableIcon(Rebound).png TypeIcon(Foot).png EffectIcon(Normal).png HitboxTableIcon(GroundedFalse).png HitboxTableIcon(AerialTrue).png S Kick SpecialsDirect.png
2 0 1.904% 0 AngleIcon95.png 30 10 0 4.5 0 0.0 1.0 3.7 1.0x 1.0x 0% HitboxTableIcon(Clang).png HitboxTableIcon(Rebound).png TypeIcon(Foot).png EffectIcon(Normal).png HitboxTableIcon(GroundedTrue).png HitboxTableIcon(AerialFalse).png S Kick SpecialsDirect.png
3 0 1.904% 0 AngleIcon95.png 30 10 0 3.2 0 0.0 5.5 0.4 1.0x 1.0x 0% HitboxTableIcon(Clang).png HitboxTableIcon(Rebound).png TypeIcon(Foot).png EffectIcon(Normal).png HitboxTableIcon(GroundedTrue).png HitboxTableIcon(AerialFalse).png S Kick SpecialsDirect.png
Final hit
0 1 3.36% 0 AngleIcon45.png 50 120 0 5.5 0 0.0 1.0 3.7 3.0x 1.0x 0% HitboxTableIcon(Clang).png HitboxTableIcon(Rebound).png TypeIcon(Foot).png EffectIcon(Normal).png HitboxTableIcon(GroundedTrue).png HitboxTableIcon(AerialTrue).png M Kick SpecialsDirect.png
1 1 3.36% 0 AngleIcon45.png 50 120 0 3.7 0 0.0 5.5 0.4 3.0x 1.0x 0% HitboxTableIcon(Clang).png HitboxTableIcon(Rebound).png TypeIcon(Foot).png EffectIcon(Normal).png HitboxTableIcon(GroundedTrue).png HitboxTableIcon(AerialTrue).png M Kick SpecialsDirect.png
Landing
0 0 2.24% 0 Sakurai angle 50 160 0 4.0 0 0.0 3.2 4.0 1.0x 1.0x 0% HitboxTableIcon(Clang).png HitboxTableIcon(Rebound).png TypeIcon(Foot).png EffectIcon(Normal).png HitboxTableIcon(GroundedTrue).png HitboxTableIcon(AerialFalse).png M Kick SpecialsDirect.png