Buried

Buried is a status condition that can be inflicted by attacks with a bury or plunge effect. It debuted in Super Smash Bros. Melee and has appeared in every subsequent game. A buried character is embedded in the ground, with the visible part of their body surrounded by churned dirt.
In Super Smash Bros. Ultimate, characters now have two buried poses, upright and upside-down. Fighters are normally buried upright, but King K. Rool, R.O.B., and Banjo & Kazooie's down throws will bury the thrown fighter upside-down. The upside-down buried pose is also used during the animation of Lucas's down throw, although it does not cause the buried condition. (While Lucas's down throw does show a character buried upside-down in SSB4, in that game it uses a character's grabbed animation rather than a specific buried pose). Being buried upright and upside-down affects the hurtbox placement of the buried character and therefore a character that is buried upright might not get hit by an attack that would hit a character buried upside down, and viceversa.
In Super Smash Bros. Ultimate, the Support Spirit skill Bury Immunity prevents the equipped fighter from being buried.
Overview

Any fighter on the ground hit by an attack with a bury effect will be buried. In SSB4 and Ultimate, a character that is lying down cannot be buried, unless they are lying down due to Snake's down throw; however, a character who has tripped can be buried. In Melee, a character lying prone cannot be buried, but they can in Brawl. If a fighter cannot be buried, they will simply take knockback as usual from the bury attack.
Examples of attacks with the bury effect are Donkey Kong's Headbutt, Villager's down smash, and the Poké Ball Pokémon Togepi's Magnitude. Additionally, the Pitfall item will bury a fighter, but the Pitfall item uses the plunge effect rather than the bury effect.
A buried fighter is immobilized until the status wears off. While buried, they cannot be grabbed or be re-buried.
The amount of time a character remains buried is dependent on that character's damage percentage; the higher the number, the longer they will be stuck to the ground. This duration can be decreased by button mashing. If the ground below the character disappears, they are automatically unburied. When the buried condition fades, the released fighter gets some invincibility frames.
In Melee, buried characters remain stuck in the ground until the effect wears off or the ground disappears. From Brawl onward, a character hit by a move that deals more than 100 units of knockback will be freed from being buried and launched as usual. In Brawl and Ultimate, the amount of knockback taken does not get reduced, allowing for reliable, early KO setups on buried characters; however, in Smash 4, it is equal to 0.7x of the knockback that would have been inflicted otherwise, drastically weakening the effectiveness of such setups.
In Ultimate, attacks performed without unburying the opponent retain their properties when the effect wears off, including neutral attacks and meteor smashes and even another status condition such as freezing, allowing for a form of knockback storage that can potentially lead to combos. 80 units of knockback - the same necessary for tumble - are required to instantly remove a character from a bury. However, mashing greatly diminishes the potential of this.
The boss Rathalos (but not as an Assist Trophy) is affected by Pitfalls, having its own unique buried appearance with a very large amount of churned dirt surrounding it. It cannot be buried by attacks with the bury effect, however.
Technical information
Super Smash Bros. Ultimate
In Ultimate, the bury base time formula is 0.5p + 1.5k + r + u + 10, where:
- p is the opponent's percentage after the damage is added.
- k is the knockback the move would have dealt.
- r is a modifier from -30 to +15 based on the user's rank in the match, meaning that players with a stock advantage will bury for less time, while players at disadvantage gain a bonus.
- u is a modifier from 0 to +30 if the user is losing and Underdog Boost is enabled, granting more benefit to players that are behind.
This formula outputs the base bury time in frames, which can be reduced by inputs. Base bury time will start at 10, going up with the opponent's percentage. Every directional input made while buried reduces the remaining time by 8 frames. Button inputs are 1.8× stronger for a reduction of 14.4 frames, but can only be made every other frame, making them worse by themselves. In addition, characters that are released by the bury sustain 12 frames of lag, adding effective frame advantage to any bury.
Certain moves use their own bury formulas instead of the general one, namely throws:
- Banjo & Kazooie's down throw:
0.5p + 35 - Donkey Kong's Headbutt:
p + 0.5d + 130if DK uses the move on the ground, andp + 0.5d + 115if he is in the air, with d being the damage dealt by the move. As such, it is affected by stale-move negation. - King K. Rool's down throw:
0.75p + 60 - R.O.B.'s down throw:
0.4p + 30
For these formulas, p is the opponent's percentage before the damage is dealt, instead of after. Due to these throws removing knockback and rank from the formula, these are also unaffected by those mechanics, allowing calculation of bury base time to be far more liner.
Bury Tech Situation Storage

Due to new mechanics relating to knockback's interactions with buries in Ultimate, there are some instances where knockback storage will result in tech situations being stored. This is known as Bury Tech Situation Storage, or BTSS[1].
Attacks stored that result in a launch angle of 0° or 180° (including the Sakurai angle at lower percentages), while an opponent has their control stick positioned in the upper half of the stick radius, cause the glitch to occur. The reason why this happens is due to buries storing knockback, and ASDI being triggered on release when the stick is held upwards at the end of the bury. This causes opponents to be forced into the tech situation. Due to ASDI being required, bury throws are unaffected by BTSS. Any buried state, as long as it isn't caused by a throw, will cause this to occur. Thus, anything from Pitfalls to Flip Jump buries can potentially cause this. Unusually, the interaction only occurs with buries, and no other state.
This technique can be used as a counter to mashing using directional inputs, although it can be avoided. Some examples include only using the lower half of the stick radius, or simply button mashing, although the latter is considered suboptimal. However, against players rotating the stick completely, it has a decently high chance of occurring. Almost every neutral attack in the game can cause this to occur due to their low knockback and Sakurai angles, giving easy access to the technique. However, there are many other options in the game that have the possibility of causing this, due to the abundance of the Sakurai angle. Since the Sakurai angle is locked to 0° prior to 60 KB, this makes an otherwise rare occurrence very easy to execute.
Opponents being able to miss techs right in front of a player gives them easy access to lock confirms, especially if they can also cover tech options. As a result, BTSS has very high reward should it occur in the right circumstances. Characters such as King K. Rool can also force it to occur with moves like down aerial pre-tumble, allowing for exceedingly high damage output that also cover tech options with alternate, reactable combo routes. However, the RNG-based inconsistencies of the technique also make it difficult to plan and prepare for. Without having a specific combo route for whether it works or doesn't, BTSS is more of an inconvenience than a benefit.
Trivia
- If buried during their extra platform drop frames, Ryu, Ken, and Terry will instantly unbury while sustaining hitlag in a similar manner to the Bounce glitch.
Gallery
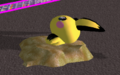
Pichu buried in Melee
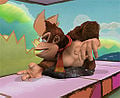
Donkey Kong buried in Brawl
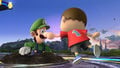
Luigi buried in Super Smash Bros. for Wii U
Wario buried upside-down in Ultimate
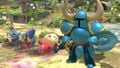
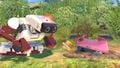
Characters buried by Shovel Knight in Ultimate


