SSBU Icon.png

Bowser Jr. (SSBU)/Down smash

From SmashWiki, the Super Smash Bros. wiki
Jump to navigationJump to search
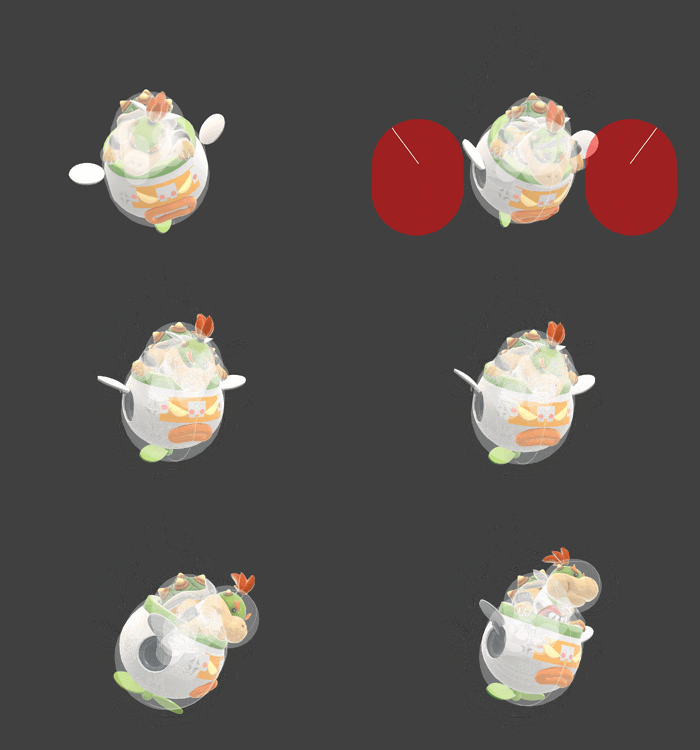
Hitbox visualization showing Bowser Jr.'s down smash.

Overview

The Junior Clown Car slams wrecking balls on both sides. It is Bowser Jr.'s most powerful smash attack at 18%, and is the third strongest down smash in the game, making it deadly for punishment. However, it has high ending lag unlike his other smash attacks, making it equally as punishable.

Update History

Super Smash Bros. Ultimate 9.0.0

  • Buff Down smash has less startup (frame 15 → 12), with its total duration reduced as well (FAF 60 → 57).

Hitboxes

ID Part Rehit rate Damage SD Angle Angle type BK KS FKV Set weight Radius Bone Offset SDI× T% Clang Rebound Effect Type G A Sound Direct Hit bits Hit part Blockable Reflectable Absorbable Flinchless No GFX Heedless
0 0 0 18.0% 0 AngleIcon53.png Standard 41 91 0 HitboxTableIcon(False).png 5.2 top 0.0 3.5 to 6.5 12.5 1.2× 1.0× 0% HitboxTableIcon(Clang).png HitboxTableIcon(NoRebound).png EffectIcon(Normal).png TypeIcon(Weapon).png HitboxTableIcon(GroundedTrue).png HitboxTableIcon(AerialTrue).png L Kick SpecialsDirect.png All All HitboxTableIcon(Blockable).png HitboxTableIcon(Unreflectable).png HitboxTableIcon(Unabsorbable).png HitboxTableIcon(False).png HitboxTableIcon(False).png HitboxTableIcon(False).png
1 0 0 18.0% 0 AngleIcon53.png Standard 41 91 0 HitboxTableIcon(False).png 5.2 top 0.0 3.5 to 6.5 -12.0 1.2× 1.0× 0% HitboxTableIcon(Clang).png HitboxTableIcon(NoRebound).png EffectIcon(Normal).png TypeIcon(Weapon).png HitboxTableIcon(GroundedTrue).png HitboxTableIcon(AerialTrue).png L Kick SpecialsDirect.png All All HitboxTableIcon(Blockable).png HitboxTableIcon(Unreflectable).png HitboxTableIcon(Unabsorbable).png HitboxTableIcon(False).png HitboxTableIcon(False).png HitboxTableIcon(False).png

Timing

Charges between 2-3
Hitboxes 12-14
Interruptible 57
Animation length 62
FrameIcon(Lag).png FrameIcon(LagChargeS).png FrameIcon(LagChargeE).png FrameIcon(Lag).png FrameIcon(Lag).png FrameIcon(Lag).png FrameIcon(Lag).png FrameIcon(Lag).png FrameIcon(Lag).png FrameIcon(Lag).png FrameIcon(Lag).png FrameIcon(Hitbox).png FrameIcon(Hitbox).png FrameIcon(Hitbox).png FrameIcon(Lag).png FrameIcon(Lag).png FrameIcon(Lag).png FrameIcon(Lag).png FrameIcon(Lag).png FrameIcon(Lag).png FrameIcon(Lag).png FrameIcon(Lag).png FrameIcon(Lag).png FrameIcon(Lag).png FrameIcon(Lag).png FrameIcon(Lag).png FrameIcon(Lag).png FrameIcon(Lag).png FrameIcon(Lag).png FrameIcon(Lag).png FrameIcon(Lag).png FrameIcon(Lag).png FrameIcon(Lag).png FrameIcon(Lag).png FrameIcon(Lag).png FrameIcon(Lag).png FrameIcon(Lag).png FrameIcon(Lag).png FrameIcon(Lag).png FrameIcon(Lag).png FrameIcon(Lag).png FrameIcon(Lag).png FrameIcon(Lag).png FrameIcon(Lag).png FrameIcon(Lag).png FrameIcon(Lag).png FrameIcon(Lag).png FrameIcon(Lag).png FrameIcon(Lag).png FrameIcon(Lag).png FrameIcon(Lag).png FrameIcon(Lag).png FrameIcon(Lag).png FrameIcon(Lag).png FrameIcon(Lag).png FrameIcon(Lag).png FrameIcon(Interruptible).png FrameIcon(Interruptible).png FrameIcon(Interruptible).png FrameIcon(Interruptible).png FrameIcon(Interruptible).png FrameIcon(Interruptible).png
Legend (1 square = 1 frame)
FrameIcon(Lag).png
Lag time
FrameIcon(LagChargeS).pngFrameIcon(LagChargeE).png
Charge interval
FrameIcon(Hitbox).png
Hitbox
FrameIcon(Interruptible).png
Interruptible