Samus (SSB4)

| Samus in Super Smash Bros. 4 | |
|---|---|
 
| |
| Universe | Metroid |
| Other playable appearances | in SSB in Melee in Brawl |
| Availability | Starter |
| Final Smash | Zero Laser |
Samus (サムス, Samusu), one of the characters revealed in the E3 2013 trailers, is a playable character in Super Smash Bros. 4. Samus is confirmed to retain all of her Special Moves and her Final Smash, Zero Laser[1]. However, she will not transform into Zero Suit Samus after using this move, and Zero Suit Samus will return as a separate character. Her design is now based off her appearance in Metroid: Other M, as opposed to the previous three games where her design was primarily based on Super Metroid and the Metroid Prime appearances.
Changes from Brawl
 Grapple Beam is much faster and has landing lag reduced.
- Forward smash appears to have gotten much faster and now has a small fire charge that blasts out of it, similar to Mario's forward smash.
- Screw Attack now does more knockback.
- Neutral attack's second hit appears to have more vertical range.
- Zero Laser is more narrow, and comes out faster. It doesn't break the Power Suit.
- Up smash deals drastically more knockback to the point where it can KO. The hits are also much closer together.
- Down tilt appears to have gained more KO power.
- Dash attack's early hit deals slightly more damage than in Brawl.
- Charge Shot claimed to have "drastically improved" speed and power.
- Missiles have a new design and do not take as long to reach their maximum speed but otherwise have no obvious changes.
 Samus now has landing lag if she lands while firing a missile.
- Down aerial is now quicker, and appears to have a larger hitbox.
- However, it deals less damage, dealing 13% as opposed to Brawl's 15%, and appears to have a sourspot.
- Down smash and up tilt have been sped up. The former also appears to have strengthened.
- However, her down smash has less damage potential.
- Forward tilt is much faster.
- However, it deals slightly less damage.
- Samus' bombs, when used airborne, don't stop falling speed as much as in Brawl.
 Neutral aerial is now a quick kick in front of her and behind her.
- Charge Shot changes color depending on Samus's palette swap.
- Grab aerial now has two hits.
- Her down tilt produces much more intense lighting effects.
The following moves appear visually unchanged:
- Second hit of her neutral combo
- Dash attack
- Forward aerial
- Back aerial
- Up aerial
- Forward smash
- Samus retains the ability to wall jump.
Special Moves
In Super Smash Bros. 4, special moves can be swapped out for different variants, but Samus has a few known variants. She retains her original special moves and her final smash. These are Samus's special moves:
| Special Move | Basic | Custom 1 | Custom 2 |
|---|---|---|---|
| Neutral Special | Charge Shot | Slow Beam | Shotgun Beam |
| Side Special | Missile | Slow Missile | Delayed Missile |
| Up Special | Screw Attack | Boost Ball | Shinespark |
| Down Special | Bomb | Slippy Bomb | Power Bomb |
| Final Smash | Zero Laser | ||
Palette Swaps
.png)
| |||||||

|

|

|

|

|

|

|

|
Trophy
Samus's trophy has been seen in Super Smash Bros. for Nintendo 3DS. In addition to a trophy of Samus's normal appearance, a trophy of Samus in her Gravity Suit from Metroid: Other M, appears in the 3DS version.
- SamusTrophy3DS1.png
Samus trophy.
- VariaSuitTrophy3DS.png
Samus in her Varia Suit trophy.
- SamusGravityTrophy3DS.png
Samus in her Gravity Suit trophy.
Gallery
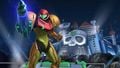
Samus in the Nintendo Direct from April 8th, 2014.
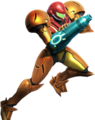
Samus's appearance during E3 2013.
Samus charging a Charge Shot in the 3DS version of the game.
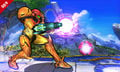
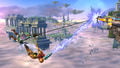
Samus firing a missile in the Wii U version of the game.
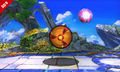
Samus dropping a Bomb in the 3DS version of the game.
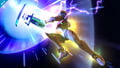
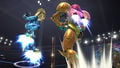
Samus charging the Zero Laser.
- Zero Laser SSB4.png
The Zero Laser.
The second hit of her neutral combo.
- Little Mac Counter.png
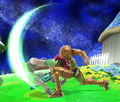
Forward tilt.
Back air.
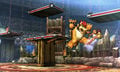
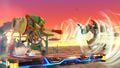
Samus and Bowser fighting on Arena Ferox.
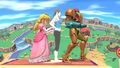
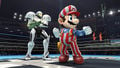
Peach, Wii Fit Trainer, and Samus.
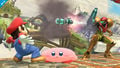
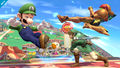
Side by side with Little Mac.
Samus posing in the Boxing Ring.
Toon Link using the Gust Bellows item on Samus.
Zero Suit Samus, with her power suit, showing off their rockets.
Samus and Link simultaneously grabbing a ledge with their tether recoveries.
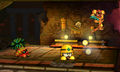
Samus battling enemies in Smash Run.
Samus in a new color change based on the Light Suit.
Samus as she appears on the 3DS cover


References
| Fighters in Super Smash Bros. 4 | |
|---|---|
| Veterans | Bowser · Captain Falcon · Charizard · Diddy Kong · Donkey Kong · Dr. Mario · Falco · Fox · Ganondorf · Ike · Jigglypuff · King Dedede · Kirby · Link · Lucario · Lucas · Luigi · Mario · Marth · Meta Knight · Mewtwo · Mr. Game & Watch · Ness · Olimar · Peach · Pikachu · Pit · R.O.B. · Roy · Samus · Sheik · Sonic · Toon Link · Wario · Yoshi · Zelda · Zero Suit Samus |
| Newcomers | Bayonetta · Bowser Jr. · Cloud · Corrin · Dark Pit · Duck Hunt · Greninja · Little Mac · Lucina · Mega Man · Mii Fighter (Mii Brawler · Mii Gunner · Mii Swordfighter) · Pac-Man · Palutena · Robin · Rosalina & Luma · Ryu · Shulk · Villager · Wii Fit Trainer |
|
| |
|---|---|
| Fighters | Samus (SSB · SSBM · SSBB · SSB4 · SSBU) · Zero Suit Samus (SSBB · SSB4 · SSBU) · Ridley (SSBU) · Dark Samus (SSBU) |
| Assist Trophies | Metroid · Dark Samus · Mother Brain |
| Bosses | Ridley · Meta Ridley |
| Stages | Planet Zebes · Brinstar · Brinstar Depths · Frigate Orpheon · Norfair · Pyrosphere Brinstar Escape Shaft (Adventure Mode) |
| Item | Screw Attack · Power Suit Piece |
| Enemies | Geemer · Kihunter · Metroid · Reo · FG II-Graham · Joulion · Zero |
| Other | Gunship · Kraid |
| Trophies, Stickers and Spirits | Trophies (SSBM · SSBB · SSB4) · Stickers · Spirits |
| Music | Brawl · SSB4 · Ultimate |
| Masterpieces | Metroid · Super Metroid |