Ganondorf (SSB4)/Forward tilt: Difference between revisions
Destructodon (talk | contribs) (addressing the template) |
m (Text replacement - "== ([^=])" to "== $1") |
||
| (13 intermediate revisions by 10 users not shown) | |||
| Line 1: | Line 1: | ||
Ganondorf leans back and | {{ArticleIcons|ssb4=y}} | ||
[[File:GanondorfFTilt.gif|thumb|270px|Hitbox visualization showing Ganondorf's forward tilt.]] | |||
==Overview== | |||
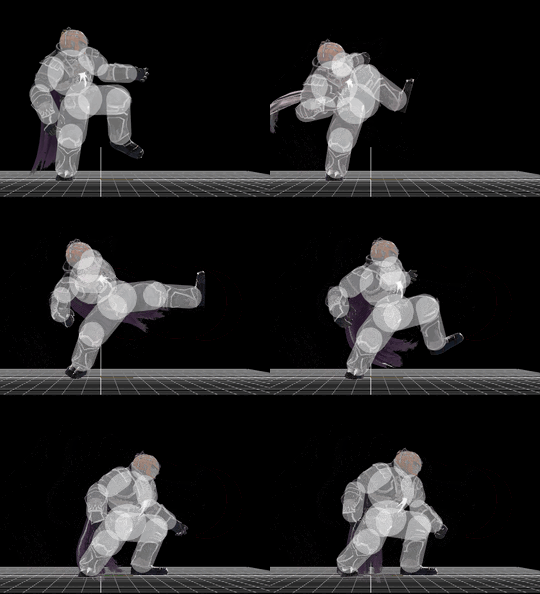
Commonly referred to as '''The Boot''', Ganondorf leans back and delivers a forceful forward kick with his left leg. | |||
It has good startup, high [[knockback]], and is a [[semi-spike]], making it an excellent edge-guarding move against characters with little horizontal recovery options, such as {{SSB4|Little Mac}}. It is one of the few tools Ganondorf has for spacing, even though it is not a great spacing move itself due to having the lowest reach of all of his ground moves. It also has a slight leanback during its start-up, allowing it to punish opponents who charge in recklessly, or be a safer [[read]] option against characters with no projectiles to aid their approach. Forward tilt is guaranteed on certain characters if they fail to tech [[Flame Choke]], though down tilt is generally better as a combo starter. | |||
The move is based on a kick Ganondorf and other large enemies use in ''The Legend of Zelda: Twilight Princess''. {{clr}} | |||
==Hitboxes== | |||
{{SSB4HitboxTableHeader}} | |||
{{SSB4HitboxTableRow | |||
|id=0 | |||
|part=0 | |||
|damage=13% | |||
|angle=22 | |||
|bk=30 | |||
|ks=88 | |||
|fkv=0 | |||
|r=5.5 | |||
|bn=5 | |||
|xpos=5.3 | |||
|type=Foot | |||
|sdi=1.0 | |||
|trip=0 | |||
|sfx=Kick | |||
|slvl=L | |||
}} | |||
{{SSB4HitboxTableRow | |||
|id=1 | |||
|part=0 | |||
|damage=12% | |||
|angle=22 | |||
|bk=30 | |||
|ks=88 | |||
|fkv=0 | |||
|r=5.3 | |||
|bn=5 | |||
|xpos=0.5 | |||
|ypos=0.0 | |||
|zpos=0.0 | |||
|type=Foot | |||
|sdi=1.0 | |||
|trip=0 | |||
|sfx=Kick | |||
|slvl=L | |||
}} | |||
{{SSB4HitboxTableRow | |||
|id=2 | |||
|part=0 | |||
|damage=12% | |||
|angle=22 | |||
|bk=30 | |||
|ks=88 | |||
|fkv=0 | |||
|r=5.1 | |||
|bn=3 | |||
|xpos=0.0 | |||
|ypos=0.0 | |||
|zpos=0.0 | |||
|type=Foot | |||
|sdi=1.0 | |||
|trip=0 | |||
|sfx=Kick | |||
|slvl=L | |||
}} | |||
|} | |||
==Timing== | |||
{|class="wikitable" | |||
!Hitbox | |||
|10-12 | |||
|- | |||
!Interruptible | |||
|40 | |||
|- | |||
!Animation length | |||
|54 | |||
|} | |||
{{FrameStripStart}} | |||
{{FrameStrip|t=Lag|c=9}}{{FrameStrip|t=Hitbox|c=3}}{{FrameStrip|t=Lag|c=27}}{{FrameStrip|t=Interruptible|c=15}} | |||
{{FrameStripEnd}} | |||
{{FrameIconLegend|lag=y|hitbox=y|interruptible=y}} | |||
{{MvSubNavGanondorf|g=SSB4}} | {{MvSubNavGanondorf|g=SSB4}} | ||
[[Category:Ganondorf (SSB4)]] | [[Category:Ganondorf (SSB4)]] | ||
[[Category:Forward tilts (SSB4)]] | [[Category:Forward tilts (SSB4)]] | ||
[[Category:Normal attacks (SSB4)]] | |||
[[Category:Semi-spikes (SSB4)]] | |||
[[Category:Foot attacks (SSB4)]] | |||
Latest revision as of 22:09, April 12, 2022
Overview[edit]
Commonly referred to as The Boot, Ganondorf leans back and delivers a forceful forward kick with his left leg.
It has good startup, high knockback, and is a semi-spike, making it an excellent edge-guarding move against characters with little horizontal recovery options, such as Little Mac. It is one of the few tools Ganondorf has for spacing, even though it is not a great spacing move itself due to having the lowest reach of all of his ground moves. It also has a slight leanback during its start-up, allowing it to punish opponents who charge in recklessly, or be a safer read option against characters with no projectiles to aid their approach. Forward tilt is guaranteed on certain characters if they fail to tech Flame Choke, though down tilt is generally better as a combo starter.
The move is based on a kick Ganondorf and other large enemies use in The Legend of Zelda: Twilight Princess.
Hitboxes[edit]
Timing[edit]
| Hitbox | 10-12 |
|---|---|
| Interruptible | 40 |
| Animation length | 54 |
Lag time |
Hitbox |
Interruptible |
|
