Giga Bowser (Final Smash)
| Giga Bowser | |
|---|---|
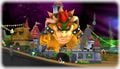
 Giga Bowser in Super Smash Bros. for Wii U. | |
| User | Bowser |
| Universe | Mario Super Smash Bros. |
Giga Bowser (ギガクッパ変身, Giga Koopa Transformation) is Bowser's Final Smash in Super Smash Bros. Brawl and Super Smash Bros. 4.
Overview[edit]
Bowser transforms into Giga Bowser, granting him his immense strength and primeval moveset from Super Smash Bros. Melee. Giga Bowser can be freely controlled for 660 frames (11 seconds) in Brawl and 480 frames (8 seconds) in Smash 4.
Despite Bowser's core changes over the course of Smash, Giga Bowser retains many of Bowser's old attacks in each of his appearances, such as the old back aerial and run animations. Thus, Giga Bowser can be seen as a semi-clone rather than a straight moveset upgrade. While in this form, Bowser has passive super armor, but can still receive damage, which may leave Bowser severely weakened and open to KOs after the transformation expires. Many of Giga Bowser's attacks have elemental effects and the smash attacks are even capable of one-hit KOs, making the Final Smash very powerful. However, despite the armor, Giga Bowser can still experience hitlag while the timer decreases, meaning that it can be difficult to deal significant damage if overwhelmed with multi-hit attacks or items like the Smart Bomb.
Instructional quotes[edit]
| Transform into the fearsome Giga Bowser, who doesn't flinch at any attack. You can't stay transformed for long, so wreak as much havoc as possible while you can. | ||
| Transform into Giga Bowser, who doesn't flinch at all. |
Changes from Melee to Brawl[edit]

Aesthetics[edit]
 Most of Bowser's new attacks and options (such as Flying Slam and crawling) are also available for Giga Bowser. However, his forward aerial, back aerial and a few other moves remain the same as in Melee.
- More attacks have visual side effects.
- Giga Bowser's voice clips are now Bowser's voice clips played at 75% speed rather than sharing Bowser's voice clips.
Attributes[edit]
 Giga Bowser has immunity to knockback essentially having armor for his entire presence.
 However, he is still affected by freeze frames, and thus powerful or long lasting multi-hit attacks can hinder Giga Bowser's movement such as a Smart Bomb that can sometimes hold him off long enough for him to revert back to Bowser.
- Giga Bowser's weight has almost been tripled (140 → 400).
- Giga Bowser walks faster (0.6 → 1.5) going from having the slowest walking speed to having the fastest walking speed.
- Giga Bowser's dash (1.5 → 1.7) and initial dash (1 → 1.9) are faster.
- Giga Bowser's traction is higher (0.06 → 0.067).
- Giga Bowser's falling speed is slightly higher (2.4 → 2.5).
- Giga Bowser's gravity is lower (0.25 → 0.1975).
- Giga Bowser's air speed is much faster (0.8 → 1.222).
- Giga Bowser's air acceleration is lower (0.05 → 0.04).
- Giga Bowser's jumpsquat is longer (6 frames → 7).
- Giga Bowser's soft landing is faster (30 frames → 18).
- Giga Bowser jumps dramatically higher (33.21125 → 73.85696598).
- Giga Bowser's shield is now impossible to break.
- Giga Bowser is no longer affected by Metal Boxes, Super Mushrooms, and Poison Mushrooms.
Ground moves[edit]
- Neutral attack deals more damage (5% → 7% (hit 1), 6% → 9% (hit 2)) improving its KO potential despite the second hit having less base knockback (30 → 20).
- Dash attack deals more damage (13%/10%/8% → 15%/13%/9%) although its base knockback was compensated on the clean hit (120 → 100 (clean), 80 → 70 (mid)) and it deals more shield damage (1 → 10 (early/mid), 0 → 3 (late)).
- The late hit deals less knockback (60 (base), 100 (scaling) → 50/80).
- All of Giga Bowser's tilts now have a darkness effect.
- Forward tilt deals much more damage (13%/12%/11% → 20%/17%/18%) improving its KO potential despite the non angled and angled down versions having lower knockback scaling (100 → 80).
- Non angled forward tilt has more ending lag (frame 37 → 41).
- Up tilt has a longer duration (frames 7-10 → 7-12), deals more shield damage (0 → 15) and has increased knockback (15 (base), 105 (scaling) → 30/100).
- Up tilt no longer deals consistent damage (13% → 15%/14%/13%/12%/11%).
- Both hits of down tilt deal more shield damage (0 → 10 (hit 1), 5 (hit 2)) and the second hit is much stronger dealing more damage (9% → 15%) and having higher base knockback (10 → 50). The first hit is now a meteor smash which can bury opponents allowing it to connect more reliably with the second hit and granting it edgeguarding potential.
- The first hit deals less damage (10% → 9%).
- Forward smash deals more damage (20%/16% → 28%/24%) and more shield damage (0 → 20).
- Forward smash deals much less knockback (50 (base), 100 (scaling) → 5/60).
- Up smash deals more damage (20%/17% → 26%/24%) and shield damage (0 → 20).
- Up smash deals less knockback (40 (base), 100 (scaling) → 30/60 (clean), 100 (scaling) → 60 (late)).
- Down smash deals much more damage (2% → 3% (loop hits), 10% → 13% (final hit), 20% → 34% (total)) and the final hit deals more shield damage (0 → 15) and has higher knockback scaling (120 → 130) significantly improving its KO potential.
Special moves[edit]
- Fire Breath weakens over time.
Changes from Brawl to SSB4[edit]

- Giga Bowser has a lighter coloured, less detailed model, while still retaining many of his physical features from Brawl.
- As the case for most other Final Smashes, Giga Bowser was slightly nerfed from his Brawl incarnation, with slightly decreased duration, damage, and knockback on his attacks.
Attributes[edit]
- Giga Bowser duration is 3 seconds shorter.
Ground attacks[edit]
- The second hit of neutral attack has significantly faster start-up (frame 25 → 10).
- Both hits of neutral attack deals 1% less damage (hit 1: 7% → 6%; hit 2: 9% → 8%).
- Forward tilt deals less damage (20% up/17% side/18% down → 14%) on all angles. In addition it no longer has the higher knockback growth (100 → 80) when angled upward.
- Up tilt deals 1% less damage on all hitboxes (15%/14%/13%/12%/11% → 14%/13%/12%/11%/10%).
- Down tilt has slightly more base knockback (50 → 60).
- Down tilt deals less damage (hit 1: 9% → 8%; hit 2: 15% → 13%).
- The late hit of dash attack's first hit deals 1% less damage (13% → 12%).
- Forward smash has increased knockback (5 (base)/60 (growth) → 45/72.)
- Forward smash deals 4% less damage (28% head/24% body → 24%/20%). In addition it has gained a sourspot on the lower body that deals 18% damage.
- Forward smash launches at a more horizontal angle (Sakurai angle → 45°).
- The first hit of up smash has increased knockback (30 (base)/60 (growth) → 35/65), and no longer has a sourspot on the head. Both hits last 1 frame longer.
- The first hit of up smash has 1 frame more start-up (frames 16 → 17).
- Down smash has 1 frame more start-up (frames 14 → 15).
Aerial attacks[edit]
- Neutral aerial deals 1% less damage (15% → 14%) and lasts 1 frame shorter (frames 6-28 → 6-27).
- Forward aerial deals 1% less damage (15% → 14%).
- Back aerial deals 1% less damage (17% → 16%).
- Up aerial deals 2% less damage (20% → 18%).
Throws/other attacks[edit]
- Pummel has slightly faster start-up (frames 11 → 9).
- Down throw has 1 frame more start-up (frames 45 → 46).
Special moves[edit]
- The farthest hitboxes of Fire Breath come out 1 frame earlier (frames 13 → 12).
- Flying Slam has 1 frame more start-up (frames 13 → 14).
Moveset[edit]
Super Smash Bros. Brawl[edit]
| Move | Description | Segment | Damage | Angle | Hit Frames | BKB | KBG | WBKB | Type | ||||
| Neutral attack | Two quick claw swipes; the least notable of Giga Bowser's attacks, although it possesses high range. | Hit 1 | 7% | 8 | 11 | 0 | 100 | 20 | |||||
| Hit 2 | 9% | 25 | 27 | 20 | 110 | 0 | |||||||
| Forward tilt | Punches while leaning forwards. When angled to the side, it has a 50% chance of tripping fighters, and can deal shield damage. When angled upwards, it deals the most damage and knockback, but can't trip fighters, nor deal shield damage. When angled downwards, it has a 100% trip rate, but does not deal shield damage. | Angled up | 20% | 12 | 16 | 28 | 100 | 0 | |||||
| Angled side | 17% | 28 | 80 | ||||||||||
| Angled down | 18% | ||||||||||||
| Up tilt | Giga Bowser swats the air above him. Has a trip chance of 50%, but since targets have to remain on the ground for it to happen, it's unlikely to occur unless the fighter is giant-sized or metal. | Hand | 15% | 7 | 12 | 30 | 100 | 0 | |||||
| Elbow | 14% | ||||||||||||
| Arm | 13% | ||||||||||||
| Upper Body | 12% | ||||||||||||
| Lower Body | 11% | ||||||||||||
| Down tilt | Does two low claw swipes. The first one is not only a Meteor Smash, but it buries grounded opponents. Deals dark damage. | Hit 1 | 9% | 14 | 18 | 10 | 80 | 0 | |||||
| Hit 2 | 15% | 27 | 31 | 50 | |||||||||
| Dash attack | A running headbutt. The second hit can bury. | Hit 1 (clean) | 15% | 11 | 14 | 100 | 30 | 0 | |||||
| Hit 1 (late) | 13% | 15 | 18 | 70 | |||||||||
| Hit 2 | 9% | 26 | 30 | 40 | 80 | ||||||||
| Forward smash | Rears back and then performs a strong headbutt, causing an explosion around his head. However, its knockback stats are rather weak, which makes opponents not fly very far at low damage, even when the attack is fully charged. As a result, this attack is inferior to Bowser's forward smash, which deals better knockback overall. | Head | 28% | 28 | 40 | 5 | 60 | 0 | |||||
| Body | 24% | ||||||||||||
| Up smash | Pounces on all fours and jumps straight up, hitting with the electric spikes on his shell. When he lands, he creates a shockwave that damages enemies farther away, but only if they're on the ground. This attack has a massive hitbox and is very effective for setting up a fatal up aerial. | Hit 1 | Body | 26% | 16 | 21 | 30 | 60 | 0 | ||||
| Head | 24% | ||||||||||||
| Hit 2 | 12% | 31 | 32 | 60 | |||||||||
| Down smash | Retracts into his shell and spins, creating a swirling blizzard that freezes foes. Has limited suction. Unlikely to KO normal-sized and tiny fighters, as they'll often become frozen before the final hit connects, completely negating the final hit's high knockback growth. Giant and metal fighters, however, are more likely to be KO'd by this attack, as the first seven hits are unlikely to freeze them, unless their current damage is high. | Hits 1-7 | Edges | 3% | 14-15, 17-18, 20-21, 23-24, 26-27, 29-30, 32-33 | 40 | 50 | 0 | |||||
| Body | |||||||||||||
| Hit 8 | 13% | 35 | 30 | 130 | |||||||||
| Neutral aerial | Giga Bowser spins around inside his shell. | 15% | 6 | 28 | 20 | 80 | 0 | ||||||
| Forward aerial | Swats forward rather quickly. Has great horizontal reach. | 15% | 8 | 11 | 50 | 80 | 0 | ||||||
| Back aerial | Giga Bowser thrusts his shell out behind him. Unlike Bowser's, this is a semi-spike. | 17% | 10 | 14 | 25 | 80 | 0 | ||||||
| Up aerial | Swings his head upward. Has huge vertical knockback, this is arguably Giga Bowser's best finisher. This attack is further complimented by its large hitbox and Giga Bowser's high jumping height. | 20% | 22 | 26 | 60 | 80 | 0 | ||||||
| Down aerial | Retracts into his shell and spins himself into the ground. If the attack is not autocancelled, the impact causes a shockwave that launches nearby targets on the ground upwards with very high knockback; the landing hitbox has no effect on aerial targets. | Hits 1-9 | 3% | 14-15, 17-18, 20-21, 23-24, 26-27, 29-30, 32-33, 35-36, 38-39 | 0 | 100 | 10 | ||||||
| Landing | 10% | 1 | 2 | 60 | 130 | 0 | |||||||
| Pummel | Does an explosive headbutt. | 6% | 11 | 12 | 0 | 100 | 30 | ||||||
| Forward throw | Giga Bowser flings the opponent using his head. | 18% | 36 | 60 | 50 | 0 | |||||||
| Back throw | Turns around and chucks the foe away. Identical to the forward throw, through it occurs much faster and uses darkness instead of flame. | 18% | 19 | 60 | 50 | 0 | |||||||
| Up throw | Giga Bowser tosses the foe upwards, retreats into his shell, and spins, damaging the foe with his spikes. | Hits 1-8 | 2% | 17-20, 21-24, 25-28, 29-32, 33-36, 37-40, 41-44, 45-48 | 0 | 100 | 0 | ||||||
| Throw | 10% | 49 | 60 | 110 | |||||||||
| Down throw | Giga Bowser performs a body slam on his opponent. Any other opponents who are nearby when Giga Bowser attacks will be buried. The attack before the throw does not have any freeze frames. | Hit 1 | 20% | 45 | 46 | 0 | 90 | 0 | |||||
| Throw | 1% | 46 | 75 | 20 | |||||||||
| Edge (<100%) | Quickly spins onto the stage and then retreats back a bit. | 16% | 8 | 35 | 0 | 100 | 90 | ||||||
| Edge (100%+) | Slowly climbs onto stage and does a quick claw jab. | 16% | 46 | 50 | 0 | 100 | 90 | ||||||
| Neutral special move | Fire Breath | Giga Bowser takes a short breath and lets loose with a stream of fire. Unfortunately, it seems that a good portion of the flames miss by shooting to the side of the playing field. Deals flame damage. | Near | 2% | 1 | 12 | 12 | 30 | 0 | ||||
| Far | 1% | 13 | 7 | 20 | |||||||||
| Side special move | Flying Slam | Giga Bowser snatches the opponent and does a massive flying suplex. Unlike Bowser's, enemies in the Subspace Emissary do not get slashed (as Giga Bowser was not designed for use there). | 22% | 13 | 80 | 50 | |||||||
| Up special move | Whirling Fortress | Giga Bowser gets into his shell and helicopters around. One of the best out-of-shield moves in the game. The ground attack only deals up to two hits, while the aerial attack deals up to 11 hits. If the second hit on the ground comes late, it can only damage fighters who are on the ground; aerial targets are unaffected. | Hit 1 (ground) | 11% | 6 | 7 | 70 | 80 | 0 | ||||
| Hit 2 (ground + clean) | 5% | 8 | 23 | 80 | 50 | ||||||||
| Hit 2 (ground + late) | 3% | 24 | 39 | 50 | |||||||||
| Hit 1 (air) | 10% | 6 | 7 | 80 | 60 | 0 | |||||||
| Hits 2-6 (air) | 3% | 8-11, 12-15, 16-19, 20-23, 24-27 | 50 | 20 | |||||||||
| Hits 7-11 (air) | 2% | 28-31, 32-35, 36-39, 40-43, 44-47 | |||||||||||
| Down special move | Bowser Bomb | Giga Bowser leaps into the air and plummets downwards. The main attack does not have any freeze frames. Has a glitch relating to it. | Ground hop | 4% | 11 | 0 | 100 | 110 | |||||
| Drop (from ground) | 23% | 38 | 45 | 75 | 0 | ||||||||
| Drop (from air) | 32 | ||||||||||||
| Landing | 18% | 1 | 2 | 60 | 72 | ||||||||
Super Smash Bros. 4[edit]
Super Smash Bros. 4 adjusts Giga Bowser's attacks by either changing their damage output, or adjusting their knockback values.
| Move | Description | Segment | Damage | Angle | Hit Frames | BKB | KBG | WBKB | Type | ||||
| Neutral attack | Two quick claw swipes; the least notable of Giga Bowser's attacks, although it possesses high range. | Hit 1 | 6% | 8 | 11 | 0 | 100 | 20 | |||||
| Hit 2 | 8% | 10 | 12 | 20 | 110 | 0 | |||||||
| Forward tilt | Punches while leaning forwards. Unlike in Super Smash Bros. Brawl, this attack deals the same amount of damage, knockback, and shield damage, regardless of how the player angles the attack. All angles have a 50% trip rate. | 14% | 12 | 16 | 28 | 80 | 0 | ||||||
| Up tilt | Giga Bowser swats the air above him. Has a trip chance of 50%, but since targets have to remain on the ground for it to happen, it's unlikely to occur unless the fighter is giant-sized or metal. | Hand | 14% | 7 | 12 | 30 | 100 | 0 | |||||
| Elbow | 13% | ||||||||||||
| Arm | 12% | ||||||||||||
| Upper Body | 11% | ||||||||||||
| Lower Body | 10% | ||||||||||||
| Down tilt | Does two low claw swipes. The first one is not only a Meteor Smash, but it buries grounded opponents. The second hit deals dark damage. | Hit 1 | 8% | 14 | 18 | 10 | 80 | 0 | |||||
| Hit 2 | 13% | 27 | 31 | 60 | |||||||||
| Dash attack | A running headbutt. The second hit can bury. | Hit 1 (clean) | 15% | 11 | 14 | 100 | 30 | 0 | |||||
| Hit 1 (late) | 12% | 15 | 18 | 70 | |||||||||
| Hit 2 | 9% | 25 | 29 | 40 | 80 | ||||||||
| Forward smash | Rears back and then performs a strong headbutt, causing an explosion around his head. Unlike in Super Smash Bros. Brawl, however, the attack now has three hitboxes, its knockback is different, and its knockback angle is no longer the Sakurai angle. On a side note, while the attack's knockback stats are better than in Super Smash Bros. Brawl, it still deals less knockback overall than Bowser's forward smash. | Head | 24% | 29 | 41 | 45 | 72 | 0 | |||||
| Upper Body | 20% | ||||||||||||
| Lower Body | 18% | ||||||||||||
| Up smash | Pounces on all fours and jumps straight up, hitting with the electric spikes on his shell. When he lands, he creates a shockwave that damages enemies farther away, but only if they're on the ground. This attack has a massive hitbox and is very effective for setting up a fatal up aerial. | Hit 1 | 26% | 17 | 23 | 35 | 65 | 0 | |||||
| Hit 2 | 12% | 31 | 33 | 60 | 60 | ||||||||
| Down smash | Retracts into his shell and spins, creating a swirling blizzard that freezes foes. Has limited suction. Unlikely to KO normal-sized and tiny fighters, as they'll often become frozen before the final hit connects, completely negating the final hit's high knockback growth. Giant and metal fighters, however, are more likely to be KO'd by this attack, as the first seven hits are unlikely to freeze them, unless their current damage is high. | Hits 1-7 | Edges | 3% | 15-16, 18-19, 21-22, 24-25, 27-28, 30-31, 33-34 | 40 | 50 | 0 | |||||
| Body | |||||||||||||
| Hit 8 | 13% | 36 | 30 | 130 | |||||||||
| Neutral aerial | Giga Bowser spins around inside his shell. | 14% | 6 | 27 | 30 | 80 | 0 | ||||||
| Forward aerial | Swats forward rather quickly. Has great horizontal reach. | 14% | 8 | 11 | 50 | 80 | 0 | ||||||
| Back aerial | Giga Bowser thrusts his shell out behind him. However, it deals less damage and knockback overall than Bowser's back aerial, KOing opponents at later damage percentages as a result. | 16% | 10 | 14 | 25 | 80 | 0 | ||||||
| Up aerial | Swings his head upward. Has huge vertical knockback, this is arguably Giga Bowser's best finisher. This attack is further complimented by its large hitbox and Giga Bowser's high jumping height. | 18% | 22 | 26 | 60 | 80 | 0 | ||||||
| Down aerial | Retracts into his shell and spins himself into the ground. If the attack is not autocancelled, the impact causes a shockwave that launches nearby targets on the ground upwards with very high knockback; the landing hitbox has no effect on aerial targets. | Hits 1-9 | 3% | 14-15, 17-18, 20-21, 23-24, 26-27, 29-30, 32-33, 35-36, 38-39 | 0 | 100 | 10 | ||||||
| Landing | 10% | 1 | 2 | 60 | 130 | 0 | |||||||
| Pummel | Does an explosive headbutt. | 6% | 9 | 11 | 0 | 100 | 30 | ||||||
| Forward throw | Giga Bowser flings the opponent using his head. | 18% | 36 | 60 | 50 | 0 | |||||||
| Back throw | Turns around and chucks the foe away. Identical to the forward throw, through it occurs much faster and uses darkness instead of flame. | 18% | 19 | 60 | 50 | 0 | |||||||
| Up throw | Giga Bowser tosses the foe upwards, retreats into his shell, and spins, damaging the foe with his spikes. | Hits 1-8 | 2% | 17-20, 21-24, 25-28, 29-32, 33-36, 37-40, 41-44, 45-48 | 0 | 100 | 0 | ||||||
| Throw | 10% | 49 | 60 | 110 | |||||||||
| Down throw | Giga Bowser performs a body slam on his opponent. Any other opponents who are nearby when Giga Bowser attacks will be buried. The attack before the throw does not have any freeze frames. | Hit 1 | 20% | 45 | 47 | 0 | 90 | 0 | |||||
| Throw | 1% | 47 | 75 | 20 | |||||||||
| Edge | Quickly spins onto the stage and then retreats back a bit. Unlike all the other edge attacks in Super Smash Bros. 4, Giga Bowser's attack still deals fixed knockback. | 16% | 8 | 35 | 0 | 100 | 90 | ||||||
| Neutral special move | Fire Breath | Giga Bowser takes a short breath and lets loose with a stream of fire. Deals flame damage. | Near | 2% | 1 | 11 | 12 | 30 | 0 | ||||
| Far | 1% | 12 | 7 | 20 | |||||||||
| Side special move | Flying Slam | Giga Bowser snatches the opponent and does a massive flying suplex. Unlike Bowser's, Giga Bowser's Flying Slam cannot deal collateral damage to opponents. | 22% | 14 | 80 | 50 | |||||||
| Up special move | Whirling Fortress | Giga Bowser gets into his shell and helicopters around. One of the best out-of-shield moves in the game. The ground attack only deals up to two hits, while the aerial attack deals up to 11 hits. If the second hit on the ground comes late, it can only damage fighters who are on the ground; aerial targets are unaffected. | Hit 1 (ground) | 11% | 6 | 7 | 70 | 80 | 0 | ||||
| Hit 2 (ground + clean) | 5% | 8 | 23 | 80 | 50 | ||||||||
| Hit 2 (ground + late) | 3% | 24 | 39 | 50 | |||||||||
| Hit 1 (air) | 10% | 6 | 7 | 80 | 60 | 0 | |||||||
| Hits 2-6 (air) | 3% | 8-11, 12-15, 16-19, 20-23, 24-27 | 50 | 20 | |||||||||
| Hits 7-11 (air) | 2% | 28-31, 32-35, 36-39, 40-43, 44-47 | |||||||||||
| Down special move | Bowser Bomb | Giga Bowser leaps into the air and plummets downwards. The main attack does not have any freeze frames. Interestingly, if used on the ground, the attack can potentially deal up to three hits against certain fighters; this can add up to 50% damage if damage multipliers are not applied, and does not take into account the landing hitbox. | Ground hop | 4% | 11 | 0 | 100 | 110 | |||||
| Drop (from ground) | 23% | 38 | 40 | 45 | 75 | 0 | |||||||
| Drop (from air) | 32 | ||||||||||||
| Landing | 18% | 1 | 2 | 60 | 72 | ||||||||
Special movements[edit]
- Up Taunt: Roars (same as Melee)
- Side Taunt: Bites in front of himself five times and wheezes while doing so.
- Down Taunt: Dances precariously on one foot.
Trophies[edit]
In Super Smash Bros. Brawl[edit]

- Giga Bowser
- Bowser, transformed into the terrible and brutal form first seen in Super Smash Bros. Melee. While in this form, he cannot be stunned or budged. His appearance is so fierce, it's as if he doesn't even belong in the Smash Bros. universe. He cannot maintain this form for long, so dealing out damage efficiently is key.
 : Super Smash Bros. Brawl
In Super Smash Bros. for Wii U[edit]

- Giga Bowser
 Prepare to behold Bowser in all his Koopa glory. This fearsome form first appeared all the way back in Melee. While transformed, Bowser deals extra damage, is better at launching foes, and even gains special effects on some of his attacks. He won't flinch and can't be thrown, but he does still take damage.
 The definitive way to prove that Bowser's the king. This fearsome form made its debut all the way back in Melee. While transformed, Bowser deals more damage, launches foes further, and certain attacks have extra effects like freezing opponents. He won't flinch, and he can't be thrown either, but he will still take damage.
Playability through hacking[edit]

- Giga Bowser can be selected as a playable character by hacking the game. His icon always shows him as normal Bowser. He plays similarly to the Final Smash version but stays transformed for the entire match, even after being KO'd. He is usable in modes that disable the ability to use Final Smashes, such as Boss Battles and the Subspace Emissary, and will not prevent Smash Balls from spawning. Other interesting oddities include:
- The ability to break Smash Balls and enter standby. Attempting to use a Final Smash like this will either freeze Giga Bowser for the rest of the match or put him in a permanent (until KO'd) fall, which causes floating on solid ground. Unless Giga Bowser is KO'd, the freeze prevents other Smash Balls from appearing. Other similarly hacked characters also experience this.
- Inability to be defeated in a Stamina Match. When played like this, he is unable to turn back into Bowser to be KO'd, so his HP will never drop below 1.
- When a match ends, Giga Bowser will appear on the Results screen instead of regular Bowser. His win animation is just his idle animation, and his losing shows him in his bind pose. Both also retain his size.
- Similarly to how he is incapable of picking up items or jumping on springs, Giga Bowser is also unable to enter doors in The Subspace Emissary, nor the Rest Area Portal in All-Star Mode. Due to this, it is only possible to complete 4 Subspace Emissary levels as him, those being Midair Stadium, The Ruined Hall, Battleship Halberd Bridge, and The Canyon, as these levels have no doors. This can be circumvented by playing in Co-Op mode, and having the other player enter the doors and the portal for him.
- Giga Bowser can be on the stage while any other Final Smash is being used at the same time. He can be hit by all of them. Negative Zone has no effects on Giga Bowser, and Peach Blossom does damage but does not put Giga Bowser to sleep. Both Triforce Slashes and the Blue Falcon can be executed but will trap him in the T-pose position afterwards due to not having proper animations. While being attacked normally breaks other characters out of this T-pose trap, only Cook Kirby, Galaxia Darkness, and Great Aether are capable of freeing Giga Bowser from the trap, as these 3 are the only moves in the game capable of breaking through Giga Bowser's armor thanks to infinite knockback. Cook Kirby breaks through the resistance upon sucking Giga Bowser into the pot, and again upon dropping Giga Bowser out of the pot. Galaxia Darkness breaks through Giga Bowser's flinch resistance upon the hit (Which also causes the minimum amount of knockback to Giga Bowser). Great Aether breaks through at the start, but freezes him again and subsequently breaks him out numerous times, before fully freeing him at the end. All other Final Smashes simply deal damage to Giga Bowser, with some slowing him down like a Smart Bomb on each hit, while others cause no lag and ignore Giga Bowser's shield.
- When played in 100-Man Brawl, the final opponent will be another Giga Bowser, making the mode very difficult to complete. An example video can be seen here.
Other oddities and glitches[edit]
- The length of time spent as Giga Bowser is not correctly affected by Training mode's speed change. For example, setting the Training Mode speed to 1/4 will only give Giga Bowser enough time for one or two attacks before reverting.
- This was fixed in Super Smash Bros. 4, where the duration of the transformation is now based on the amount of frames that have played.
- When played as a Final Smash, on Stamina Mode in Super Smash Bros. Brawl and Super Smash Bros. 4, Giga Bowser does not get defeated (along with Wario-Man, Giga Mac, Mega Charizard X, and Mega Lucario) if reduced to 0 HP. This causes the Undead Glitch.
- Giga Bowser's shield cannot be broken by any means. He can still be damaged when the shield is too small, but it will not break or be canceled. The shield does not return to full strength after the transformation finishes. Also of note is that Giga Bowser cannot be grabbed or Inhaled, which also includes special moves having to do with grabbing such as Falcon Dive. Strangely, the unbreakable shield is exclusive to Giga Bowser, as Wario-Man's shield will break normally.
- Since hitstun causes characters to be KO'd off the top blast line, it is possible to KO Giga Bowser if he is attacked while above the line. The same is true if Giga Bowser is carried above the blast line by a platform, including the top of any of the 3 Landmasters.
- Giga Bowser is not recognized as a target by stage elements such as the Ultimate Chimera or the Bulborb; he will be ignored and not bitten by the two. In fact, Giga Bowser can jump up through the Bulborb's mouth's ceiling.
- Giga Bowser's large size can cause teleportation due to grabbing edges in enclosed areas, such as in Jungle Japes. The teleportation happens because Giga Bowser grabs the edge of the higher platforms, which causes him to land on the middle platform due to his large size.
- Giga Bowser cannot swim, pick up items, or use a spring. He can use the Starman item and lightning bolts, however, and can also have a Bunny Hood, a Superspicy Curry, a Franklin Badge, flower effects, and be either giant or tiny depending on the size selected in the Special Brawl mode. The flower effect can also be applied during a normal match by hitting Giga Bowser with any moves that cause the effect. Giga Bowser is also unaffected by Pitfalls, Banana Peels, Metal Boxes, both Super and Poison Mushrooms, Lightning Bolts, and Bumpers. All other damaging items simply deal damage to him.
- It is possible for the crowd to cheer for a player using Giga Bowser. However, because Giga Bowser lacks an audience cheer sound clip, the game will play a beep in succession for however many times the sound clip was to play, then play the clapping sound clip as usual.
- If a CPU is using Giga Bowser, it will act strangely if hit by attacks that don't cause flinching. It will attempt to duck under them, jump over them, shield them, and otherwise dodge them. The CPU will not react in any similar way against other types of attack.
- If Giga Bowser and another fighter are KO'd at the same, or a similar time in SSB4, the revival platform for Bowser and the other fighter will appear in the same place, rather than one appearing to the side of the other.
Origin[edit]
Giga Bowser first appeared in Melee as a hidden boss in Adventure Mode, and was considered to be a separate character from Bowser. To battle him, Adventure Mode must be done on Normal difficulty or higher in 18 minutes or less with no continues. Giga Bowser also appeared in the final event in Melee as an opponent, alongside with Ganondorf and Mewtwo. Giga Bowser returned for Brawl and SSB4, but as a Final Smash transformation for Bowser and not a separate character. Aside from being a semi-playable character in Brawl and Smash 4, Giga Bowser does not make any other playable appearances without hacking the game.
Strictly speaking, Giga Bowser did not appear in any Mario games, arguably making him a Smash character. This is because Giga Bowser is based on Masahiro Sakurai's interpretation of Bowser's 8-bit sprites as a "frenzied, terrifying monster".[1] His transformation ability could, however, be a reference to the tradition of final boss fights in Mario games involving Bowser growing to gigantic size. This first appeared with Baby Bowser in Super Mario World 2: Yoshi's Island, while the adult Bowser first did so in Super Mario Sunshine, which was in development at the same time as Melee.
A giant Bowser in Super Mario Galaxy 2

Gallery[edit]
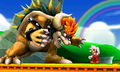
Giga Bowser's forward tilt in Brawl.

Giga Bowser in SSB4.
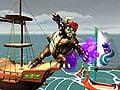
Giga Bowser in Smash 3DS.


Names in other languages[edit]

| Language | Name |
|---|---|
| ギガクッパ変身, Giga Koopa Transformation | |
| Giga Bowser | |
| Giga Bowser | |
| Giga-Bowser | |
| Giga Bowser | |
| Giga Bowser | |
| 기가쿠파 변신, Giga Koopa Transformation |
Trivia[edit]
- Giga Bowser is one of only four characters who can use Darkness attacks in Brawl, the other ones being Ganondorf, Crazy Hand, and Olimar's White Pikmin (though this is considered poison, it technically uses the darkness effect).
- Within the game's files, Bowser's sound effect file actually contains duplicates of his voice clips and sound effects. These are no different from the normal sounds, but are placed in a filter during gameplay to create Giga Bowser's deeper voice. The voice can also be pitched higher or lower in Special Brawl matches involving size changes. Both Giga Bowser's voice clips and sound effects can be played in the game's Sound Test, being placed together with Bowser's sounds.
- The fact that Giga Bowser has a results screen animation when using an infinite Giga Bowser hack is odd, considering Wario-Man and other characters playable in this fashion do not have them, and thus freeze the game upon a match ending unless their animation files are hacked. Also of note is how this Giga Bowser never turns back into Bowser when KO'd, while Wario-Man will always turn back into Wario upon being KO'd. This may suggest that Giga Bowser was originally going to reprise his role as a boss like in Melee, while Bowser was to have a non-transforming Final Smash.
- Within Brawl's files, Giga Bowser actually has animations for numerous actions he is normally unable to do. These include all animations for being thrown, picking up light items and food, all light item throws, using the Screw Attack, growing or shrinking via items, picking up and releasing an Assist Trophy, assembling and riding the Dragoon, slipping, and teetering over a ledge. Most of these relate to actions Giga Bowser could do in Melee that he is missing in Brawl.
- In SSB4, there are files for palette swaps for Giga Bowser, but they aren't used in the game. The same thing applies to Giga Mac, Wario-Man, and Mega Lucario, as shown here.
- While Bowser overwent a major moveset overhaul on the transition from Brawl to SSB4, Giga Bowser retained his Melee-inspired moveset. This also applies for his role as a boss in Ultimate.
External links[edit]
References[edit]
| Neutral special | Fire Breath | |||
|---|---|---|---|---|
| Side special | Koopa Klaw | Flying Slam | ||
| Up special | Whirling Fortress | |||
| Down special | Bowser Bomb | |||
| Final Smash | — | Giga Bowser | Giga Bowser Punch | |