SSBM Icon.png

Falco (SSBM)/Down aerial

From SmashWiki, the Super Smash Bros. wiki
Jump to navigationJump to search

Overview[edit]

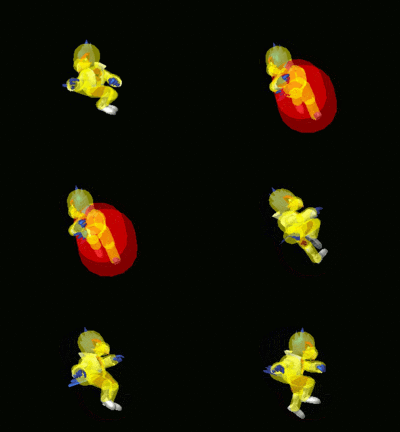
The hitbox of Falco's dair in Melee.
The hitbox of Falco's dair.

Falco spins around in place at a downward angle. His down aerial is considered the best spike in the game, having an extremely long duration of 20 frames and having sourspot hitboxes that still spike relatively powerfully (in NTSC only). The move is generally regarded as the best non special move in the game, and one of the best overall attacks in Melee. Falco's down aerial is vital to his success as a character, acting as a powerful approach, combo, tech chasing and edgeguarding option all at once. The move is Falco's most rewarding approach option; at low percents the move directly combos into his shine or down tilt, and at higher percents combos into other aerials including itself. In addition, the move cannot be properly crouch canceled, aiding in its abilities as a neutral opener at low percents.

Using this move in conjunction with the shine is known as pillaring and is the basis for all of Falco's combos; the vertical knockback of shine directly combos into a down aerial which as a spike, links perfectly into another shine. This cycle of shines and down aerials is expanded with a variety of other moves, most notably up tilt, neutral aerial, and back aerial, and is a notable way to wear down shields. The possibilities opened up by Falco's down aerial are near unlimited, and this is one of the primary reasons why Falco is such an unforgiving character; in the hands of a competent player, this move can absolutely devastate every other character, potentially netting KOs as early as 30%.

Hitboxes[edit]

NTSC[edit]

ID Part Damage SD Angle BK KS FKV Radius Bone Offset Clang Rebound Effect G A Sound
Clean
0 0 12% 0 AngleIcon290spk.png 10 100 0 5.15592 7 -1.32804 1.495998 0.0 HitboxTableIcon(Clang).png HitboxTableIcon(Rebound).png EffectIcon(Normal).png HitboxTableIcon(GroundedTrue).png HitboxTableIcon(AerialTrue).png L Kick
1 0 12% 0 AngleIcon290spk.png 10 100 0 5.987898 7 0.99603 0.99603 0.0 HitboxTableIcon(Clang).png HitboxTableIcon(Rebound).png EffectIcon(Normal).png HitboxTableIcon(GroundedTrue).png HitboxTableIcon(AerialTrue).png L Kick
Late
0 0 9% 0 AngleIcon290spk.png 20 100 0 5.15592 7 -1.32804 1.495998 0.0 HitboxTableIcon(Clang).png HitboxTableIcon(Rebound).png EffectIcon(Normal).png HitboxTableIcon(GroundedTrue).png HitboxTableIcon(AerialTrue).png M Kick
1 0 9% 0 AngleIcon290spk.png 20 100 0 5.987898 7 0.99603 0.99603 0.0 HitboxTableIcon(Clang).png HitboxTableIcon(Rebound).png EffectIcon(Normal).png HitboxTableIcon(GroundedTrue).png HitboxTableIcon(AerialTrue).png M Kick

PAL[edit]

ID Part Damage SD Angle BK KS FKV Radius Bone Offset Clang Rebound Effect G A Sound
Clean
0 0 12% 0 AngleIcon290spk.png 10 100 0 5.15592 7 -1.32804 1.495998 0.0 HitboxTableIcon(Clang).png HitboxTableIcon(Rebound).png EffectIcon(Normal).png HitboxTableIcon(GroundedTrue).png HitboxTableIcon(AerialTrue).png L Kick
1 0 12% 0 AngleIcon290spk.png 10 100 0 5.987898 7 0.99603 0.99603 0.0 HitboxTableIcon(Clang).png HitboxTableIcon(Rebound).png EffectIcon(Normal).png HitboxTableIcon(GroundedTrue).png HitboxTableIcon(AerialTrue).png L Kick
Late
0 0 9% 0 Sakurai angle 20 100 0 5.15592 7 -1.32804 1.495998 0.0 HitboxTableIcon(Clang).png HitboxTableIcon(Rebound).png EffectIcon(Normal).png HitboxTableIcon(GroundedTrue).png HitboxTableIcon(AerialTrue).png M Kick
1 0 9% 0 Sakurai angle 20 100 0 5.987898 7 0.99603 0.99603 0.0 HitboxTableIcon(Clang).png HitboxTableIcon(Rebound).png EffectIcon(Normal).png HitboxTableIcon(GroundedTrue).png HitboxTableIcon(AerialTrue).png M Kick

Summary:

  • Nerf Late hit is now the Sakurai angle, not a spike.

Timing[edit]

Attack[edit]

Initial autocancel 1-4
Clean hit 5-14
Late hit 15-24
Ending autocancel 30-
Animation length 49
Interruptible 60
FrameIcon(Lag).png FrameIcon(Lag).png FrameIcon(Lag).png FrameIcon(Lag).png FrameIcon(Hitbox).png FrameIcon(Hitbox).png FrameIcon(Hitbox).png FrameIcon(Hitbox).png FrameIcon(Hitbox).png FrameIcon(Hitbox).png FrameIcon(Hitbox).png FrameIcon(Hitbox).png FrameIcon(Hitbox).png FrameIcon(HitboxChangeS).png FrameIcon(HitboxChangeE).png FrameIcon(Hitbox).png FrameIcon(Hitbox).png FrameIcon(Hitbox).png FrameIcon(Hitbox).png FrameIcon(Hitbox).png FrameIcon(Hitbox).png FrameIcon(Hitbox).png FrameIcon(Hitbox).png FrameIcon(Hitbox).png FrameIcon(Lag).png FrameIcon(Lag).png FrameIcon(Lag).png FrameIcon(Lag).png FrameIcon(Lag).png FrameIcon(Lag).png FrameIcon(Lag).png FrameIcon(Lag).png FrameIcon(Lag).png FrameIcon(Lag).png FrameIcon(Lag).png FrameIcon(Lag).png FrameIcon(Lag).png FrameIcon(Lag).png FrameIcon(Lag).png FrameIcon(Lag).png FrameIcon(Lag).png FrameIcon(Lag).png FrameIcon(Lag).png FrameIcon(Lag).png FrameIcon(Lag).png FrameIcon(Lag).png FrameIcon(Lag).png FrameIcon(Lag).png FrameIcon(Lag).png
FrameIcon(Autocancel).png FrameIcon(Autocancel).png FrameIcon(Autocancel).png FrameIcon(Autocancel).png FrameIcon(Blank).png FrameIcon(Blank).png FrameIcon(Blank).png FrameIcon(Blank).png FrameIcon(Blank).png FrameIcon(Blank).png FrameIcon(Blank).png FrameIcon(Blank).png FrameIcon(Blank).png FrameIcon(Blank).png FrameIcon(Blank).png FrameIcon(Blank).png FrameIcon(Blank).png FrameIcon(Blank).png FrameIcon(Blank).png FrameIcon(Blank).png FrameIcon(Blank).png FrameIcon(Blank).png FrameIcon(Blank).png FrameIcon(Blank).png FrameIcon(Blank).png FrameIcon(Blank).png FrameIcon(Blank).png FrameIcon(Blank).png FrameIcon(Blank).png FrameIcon(Autocancel).png FrameIcon(Autocancel).png FrameIcon(Autocancel).png FrameIcon(Autocancel).png FrameIcon(Autocancel).png FrameIcon(Autocancel).png FrameIcon(Autocancel).png FrameIcon(Autocancel).png FrameIcon(Autocancel).png FrameIcon(Autocancel).png FrameIcon(Autocancel).png FrameIcon(Autocancel).png FrameIcon(Autocancel).png FrameIcon(Autocancel).png FrameIcon(Autocancel).png FrameIcon(Autocancel).png FrameIcon(Autocancel).png FrameIcon(Autocancel).png FrameIcon(Autocancel).png FrameIcon(Autocancel).png

Landing lag[edit]

Animation length 18
L-cancelled animation length 9
Normal  FrameIcon(Lag).png FrameIcon(Lag).png FrameIcon(Lag).png FrameIcon(Lag).png FrameIcon(Lag).png FrameIcon(Lag).png FrameIcon(Lag).png FrameIcon(Lag).png FrameIcon(Lag).png FrameIcon(Lag).png FrameIcon(Lag).png FrameIcon(Lag).png FrameIcon(Lag).png FrameIcon(Lag).png FrameIcon(Lag).png FrameIcon(Lag).png FrameIcon(Lag).png FrameIcon(Lag).png
L-cancelled  FrameIcon(Lag).png FrameIcon(Lag).png FrameIcon(Lag).png FrameIcon(Lag).png FrameIcon(Lag).png FrameIcon(Lag).png FrameIcon(Lag).png FrameIcon(Lag).png FrameIcon(Lag).png FrameIcon(Blank).png FrameIcon(Blank).png FrameIcon(Blank).png FrameIcon(Blank).png FrameIcon(Blank).png FrameIcon(Blank).png FrameIcon(Blank).png FrameIcon(Blank).png FrameIcon(Blank).png
Legend (1 square = 1 frame)
FrameIcon(Lag).png
Lag time
FrameIcon(Hitbox).png
Hitbox
FrameIcon(HitboxChangeS).pngFrameIcon(HitboxChangeE).png
Hitbox change
FrameIcon(Autocancel).png
Autocancel